Published on: May 1, 2024
16 min read
Migration guide: GitHub Advanced Security to GitLab Ultimate
Understand the similarities and differences between GitLab Ultimate and GitHub Advanced Security. Then follow this in-depth tutorial to make the move to the GitLab DevSecOps platform.


GitLab is the most comprehensive AI-powered DevSecOps platform, enabling organizations to deliver more secure software faster with one platform for your entire software delivery lifecycle. GitHub provides an Advanced Security add-on, which enables additional security features within GitHub. However, it lacks the depth and breadth of security features provided natively by GitLab. Organizations looking to migrate to GitLab Ultimate to enhance their security across all areas of the SDLC can use this guide to compare the two offerings and as a tutorial to move to the GitLab platform.
This article includes:
- A comparison between GitLab Ultimate and GitHub Advanced Security
- How to migrate a GitHub repository to GitLab
- How to migrate from GitHub Advanced Security to GitLab Ultimate feature-by-feature
- An introduction to additional GitLab Ultimate's security features
A comparison between GitLab Ultimate and GitHub Advanced Security
GitLab Ultimate is GitLab's top subscription tier for enterprises looking to deliver secure software faster. GitHub Advanced Security is an add-on to GitHub Enterprise, which enables additional security features.
Similarities between GitLab Ultimate and GitHub Advanced Security
GitLab Ultimate and GitHub Advanced Security both provide:
- Static Application Security Testing (SAST), secret scanning, and dependency scanning
- contextual vulnerability intelligence and resolution advice
- a list of dependencies or software bill of materials (SBOM)
- security metrics and insights
Differences between GitLab Ultimate and GitHub Advanced Security
GitLab Ultimate differs from GitHub Advanced Security in the following ways:
- GitLab natively provides additional code scanners such as container scanning, Dynamic Application Security Testing (DAST), Web API fuzz testing, and more. These scanners are a mix of optimized proprietary and open source technologies with custom rulesets. For a full list, see the GitLab AppSec documentation.
- GitLab provides granular security guardrails to prevent insecure code from being merged without approval.
- GitLab security scanners can be run in air-gapped or limited-connectivity environments.
- GitLab provides the Compliance Center, which enables oversight of compliance violations across an entire organization.
GitLab Ultimate also provides additional security and compliance capabilities, portfolio and value stream management, live upgrade assistance, and more. See the GitLab Ultimate documentation to learn more about these additional features.
How to migrate a GitHub repository to GitLab
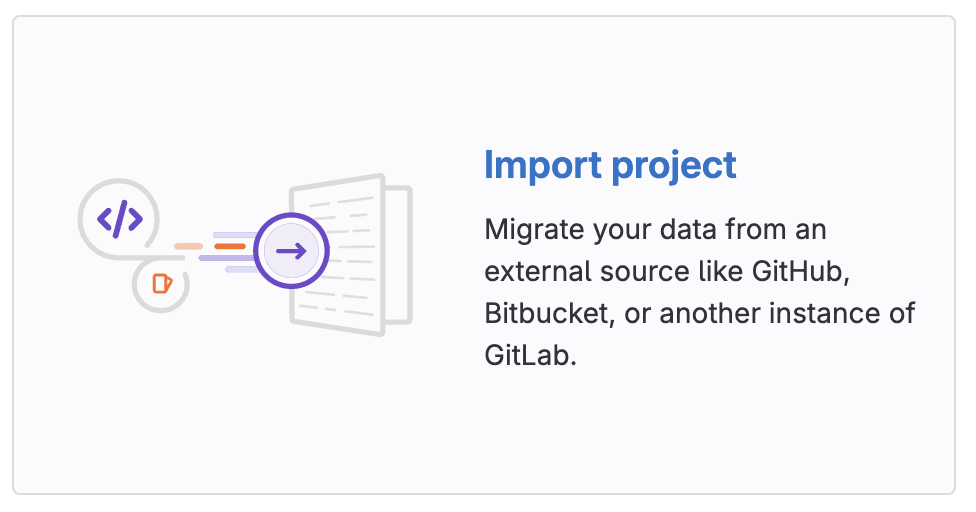
GitLab provides a built-in importer, which allows you to import your GitHub projects from either GitHub.com or GitHub Enterprise to GitLab. The importer allows you to migrate not only the GitHub Repository to GitLab, but several other objects, including issues, collaborators (members), and pull requests. For a complete list of what can be migrated, see the GitHub imported data documentation. You can perform the migration as follows:
- On the left sidebar, at the top, select Create new (+).
- Select New project/repository under the In GitLab section.
- Select Import project.
- Press the GitHub button.
- If using GitLab self-managed, then you must enable the GitHub importer.
- Note that other importers can be initiated in the same way.
- Now, you can do one of the following:
- Authorize with GitHub Oauth by selecting Authorize with GitHub.
- Use a GitHub personal access token:
- Go to https://github.com/settings/tokens/new.
- In the Note field, enter a token description.
- Select the repo scope.
- Optionally, to import Collaborators, select the read:org scope.
- Press the Generate token button.
- On the GitLab import page, in the Personal Access Token field, paste the GitHub personal access token.
- Press the Authenticate button.
- Select the items you wish to migrate.
- Select the projects you wish to migrate and to where.
- Press the Import button.
Your imported project should now be in your workspace. For additional guidance on migrating from GitHub to GitLab, watch this video:
You can also perform the migration using a GitHub personal access token or the GitLab REST API. The importer also allows importing from other sources such as Bitbucket or Gitea. To learn more, read the importer documentation.
How to migrate feature-by-feature
Let’s go over how to leverage each feature provided by GitHub Advanced Security in GitLab Ultimate. You must have a GitLab Ultimate license to continue. GitLab provides a free 30-day trial to get you started.
Code scanning
GitHub provides code scanning to provide contextual vulnerability intelligence and advice for static source code. The same can be done within GitLab by enabling SAST. GitLab SAST scanners cover a wider set of programming languages and frameworks than GitHub’s CodeQL.
To enable code scanning in GitLab, you can simply add the SAST template to your .gitlab-ci.yml:
include:
  - template: Jobs/SAST.gitlab-ci.yml
Once the template has been added, any time new code is checked in, SAST will auto-detect the programming languages used in your project. It will then scan the source code for known vulnerabilities.
Note: Security scanners can also be added to your project using GitLab's security configuration, which can automatically create a merge request to update your pipeline. To learn more, see the Configure SAST by using the UI documentation.
SAST results of the diff between the feature-branch and the target-branch display in the merge request widget. The merge request widget displays SAST results and resolutions that were introduced by the changes made in the merge request.
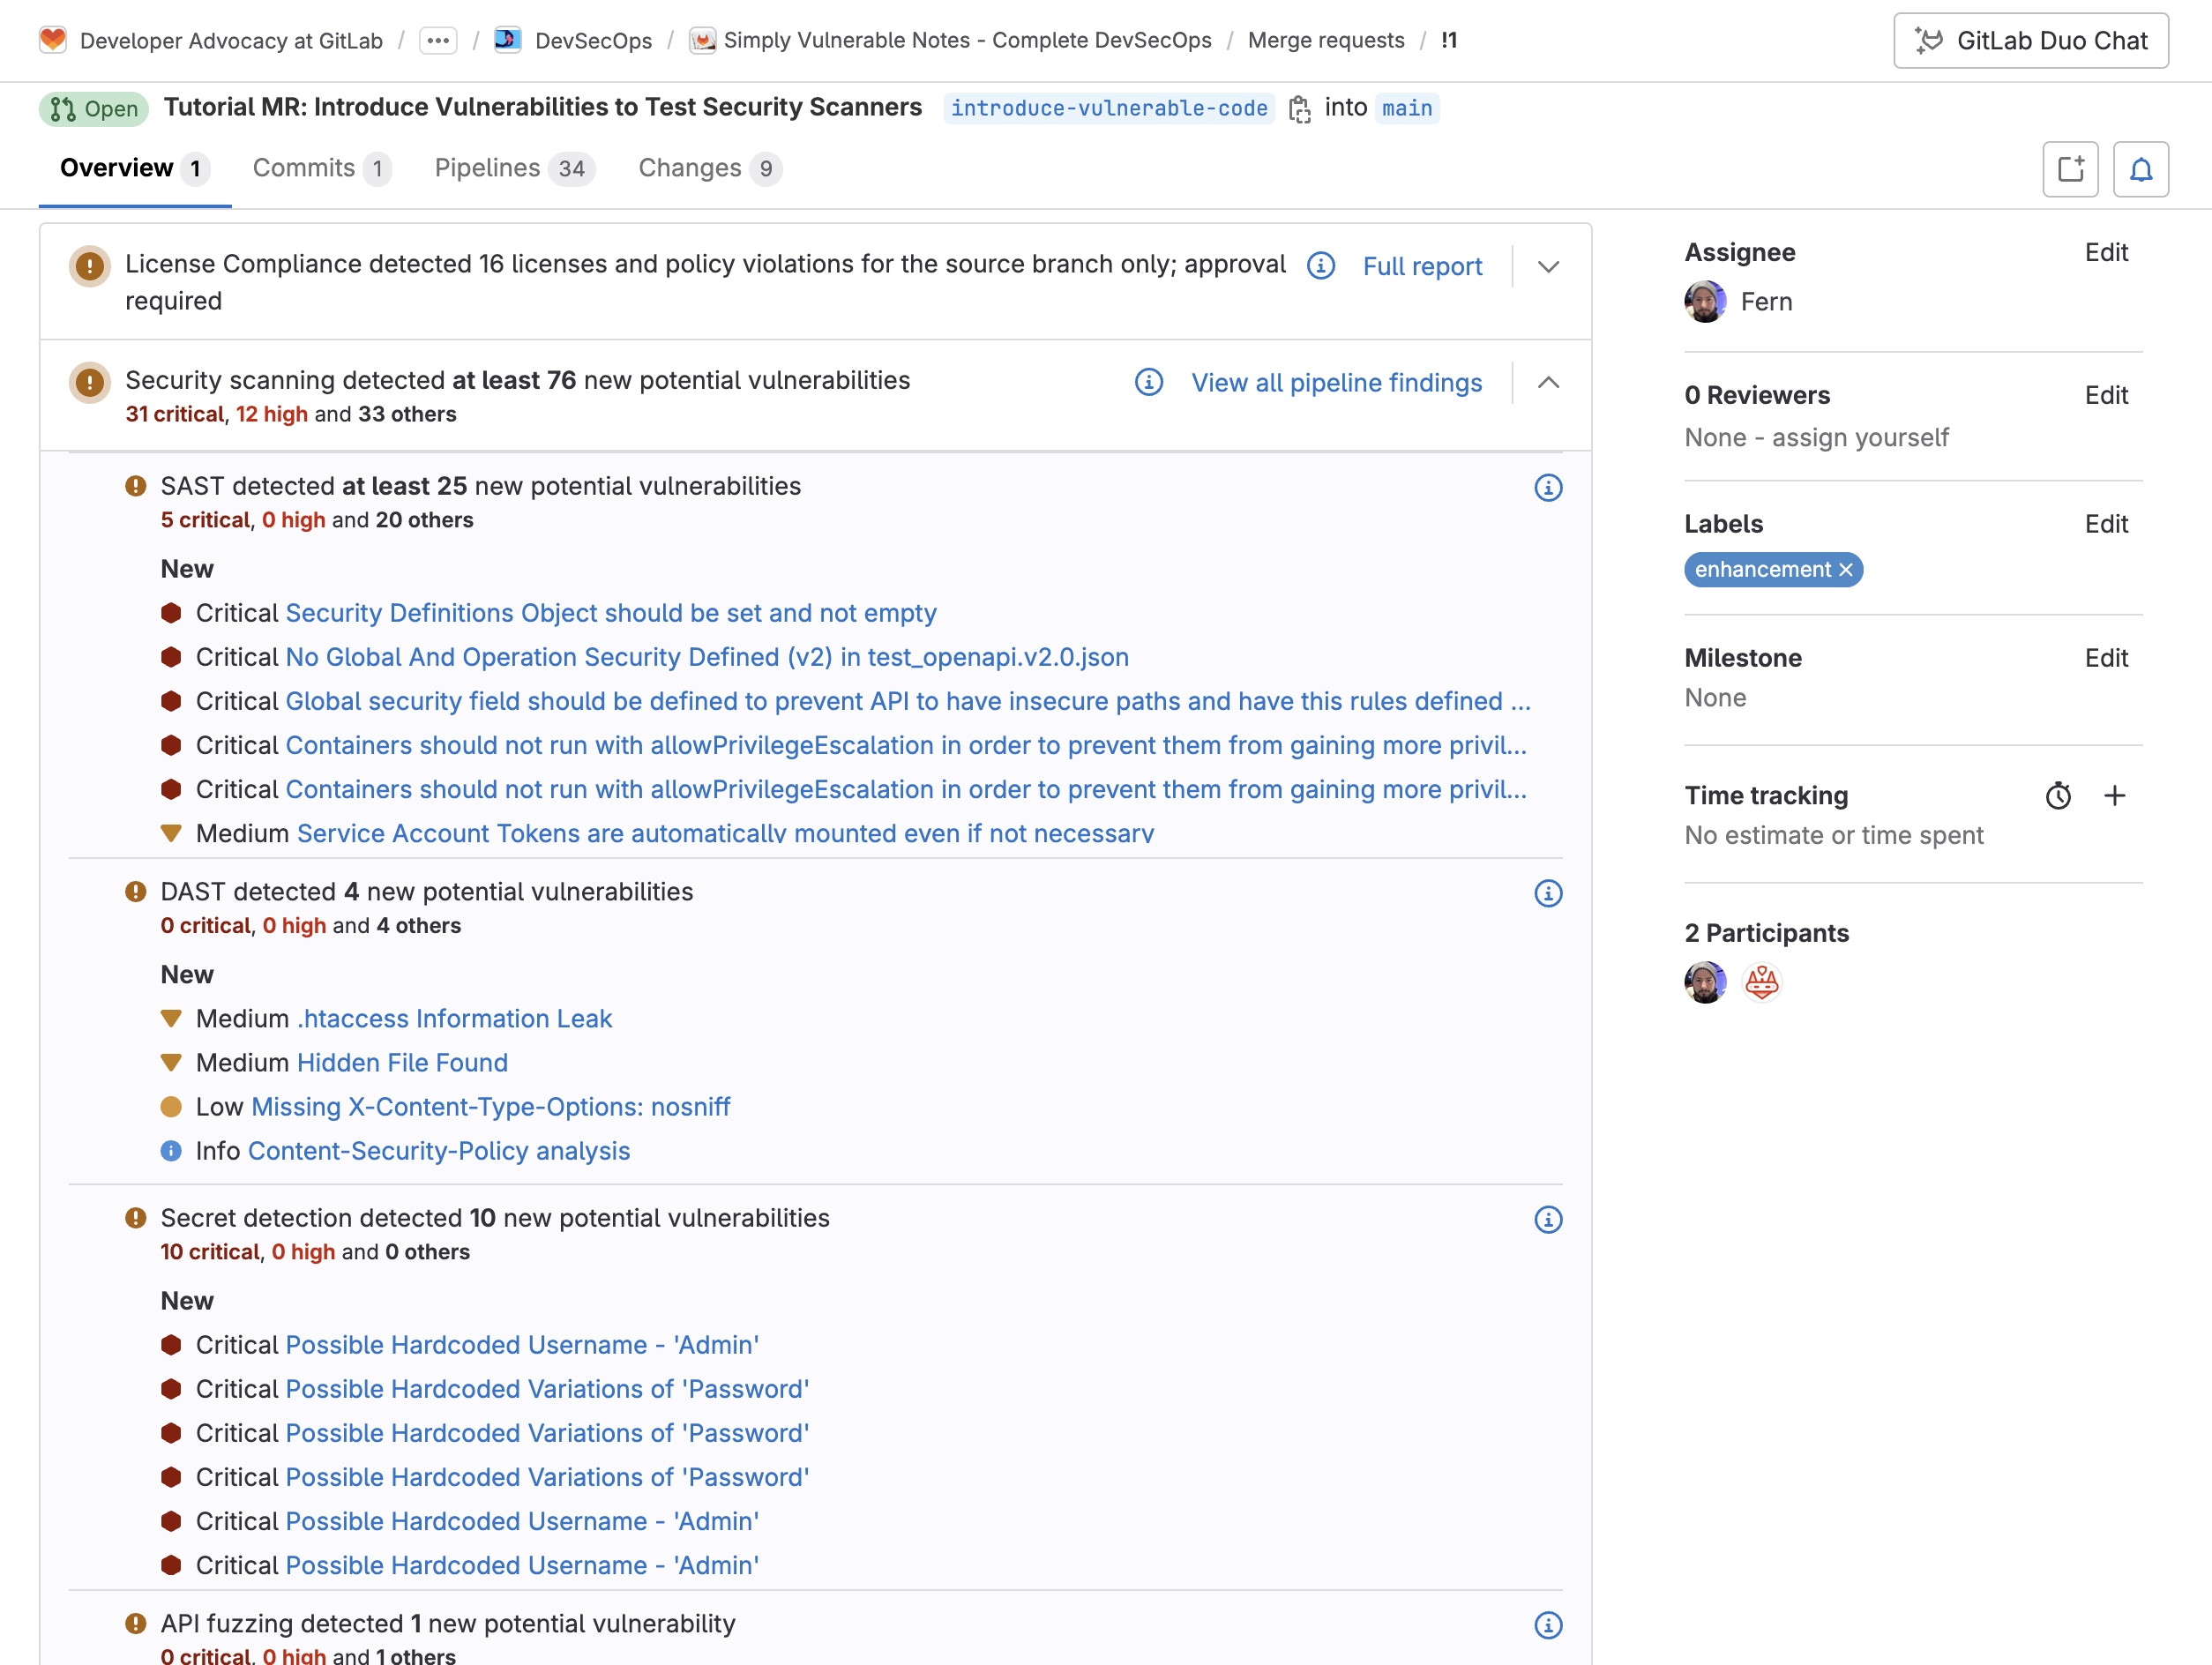
Each vulnerability displays data to assist with remediation, including detailed description, severity, location, and resolution information:
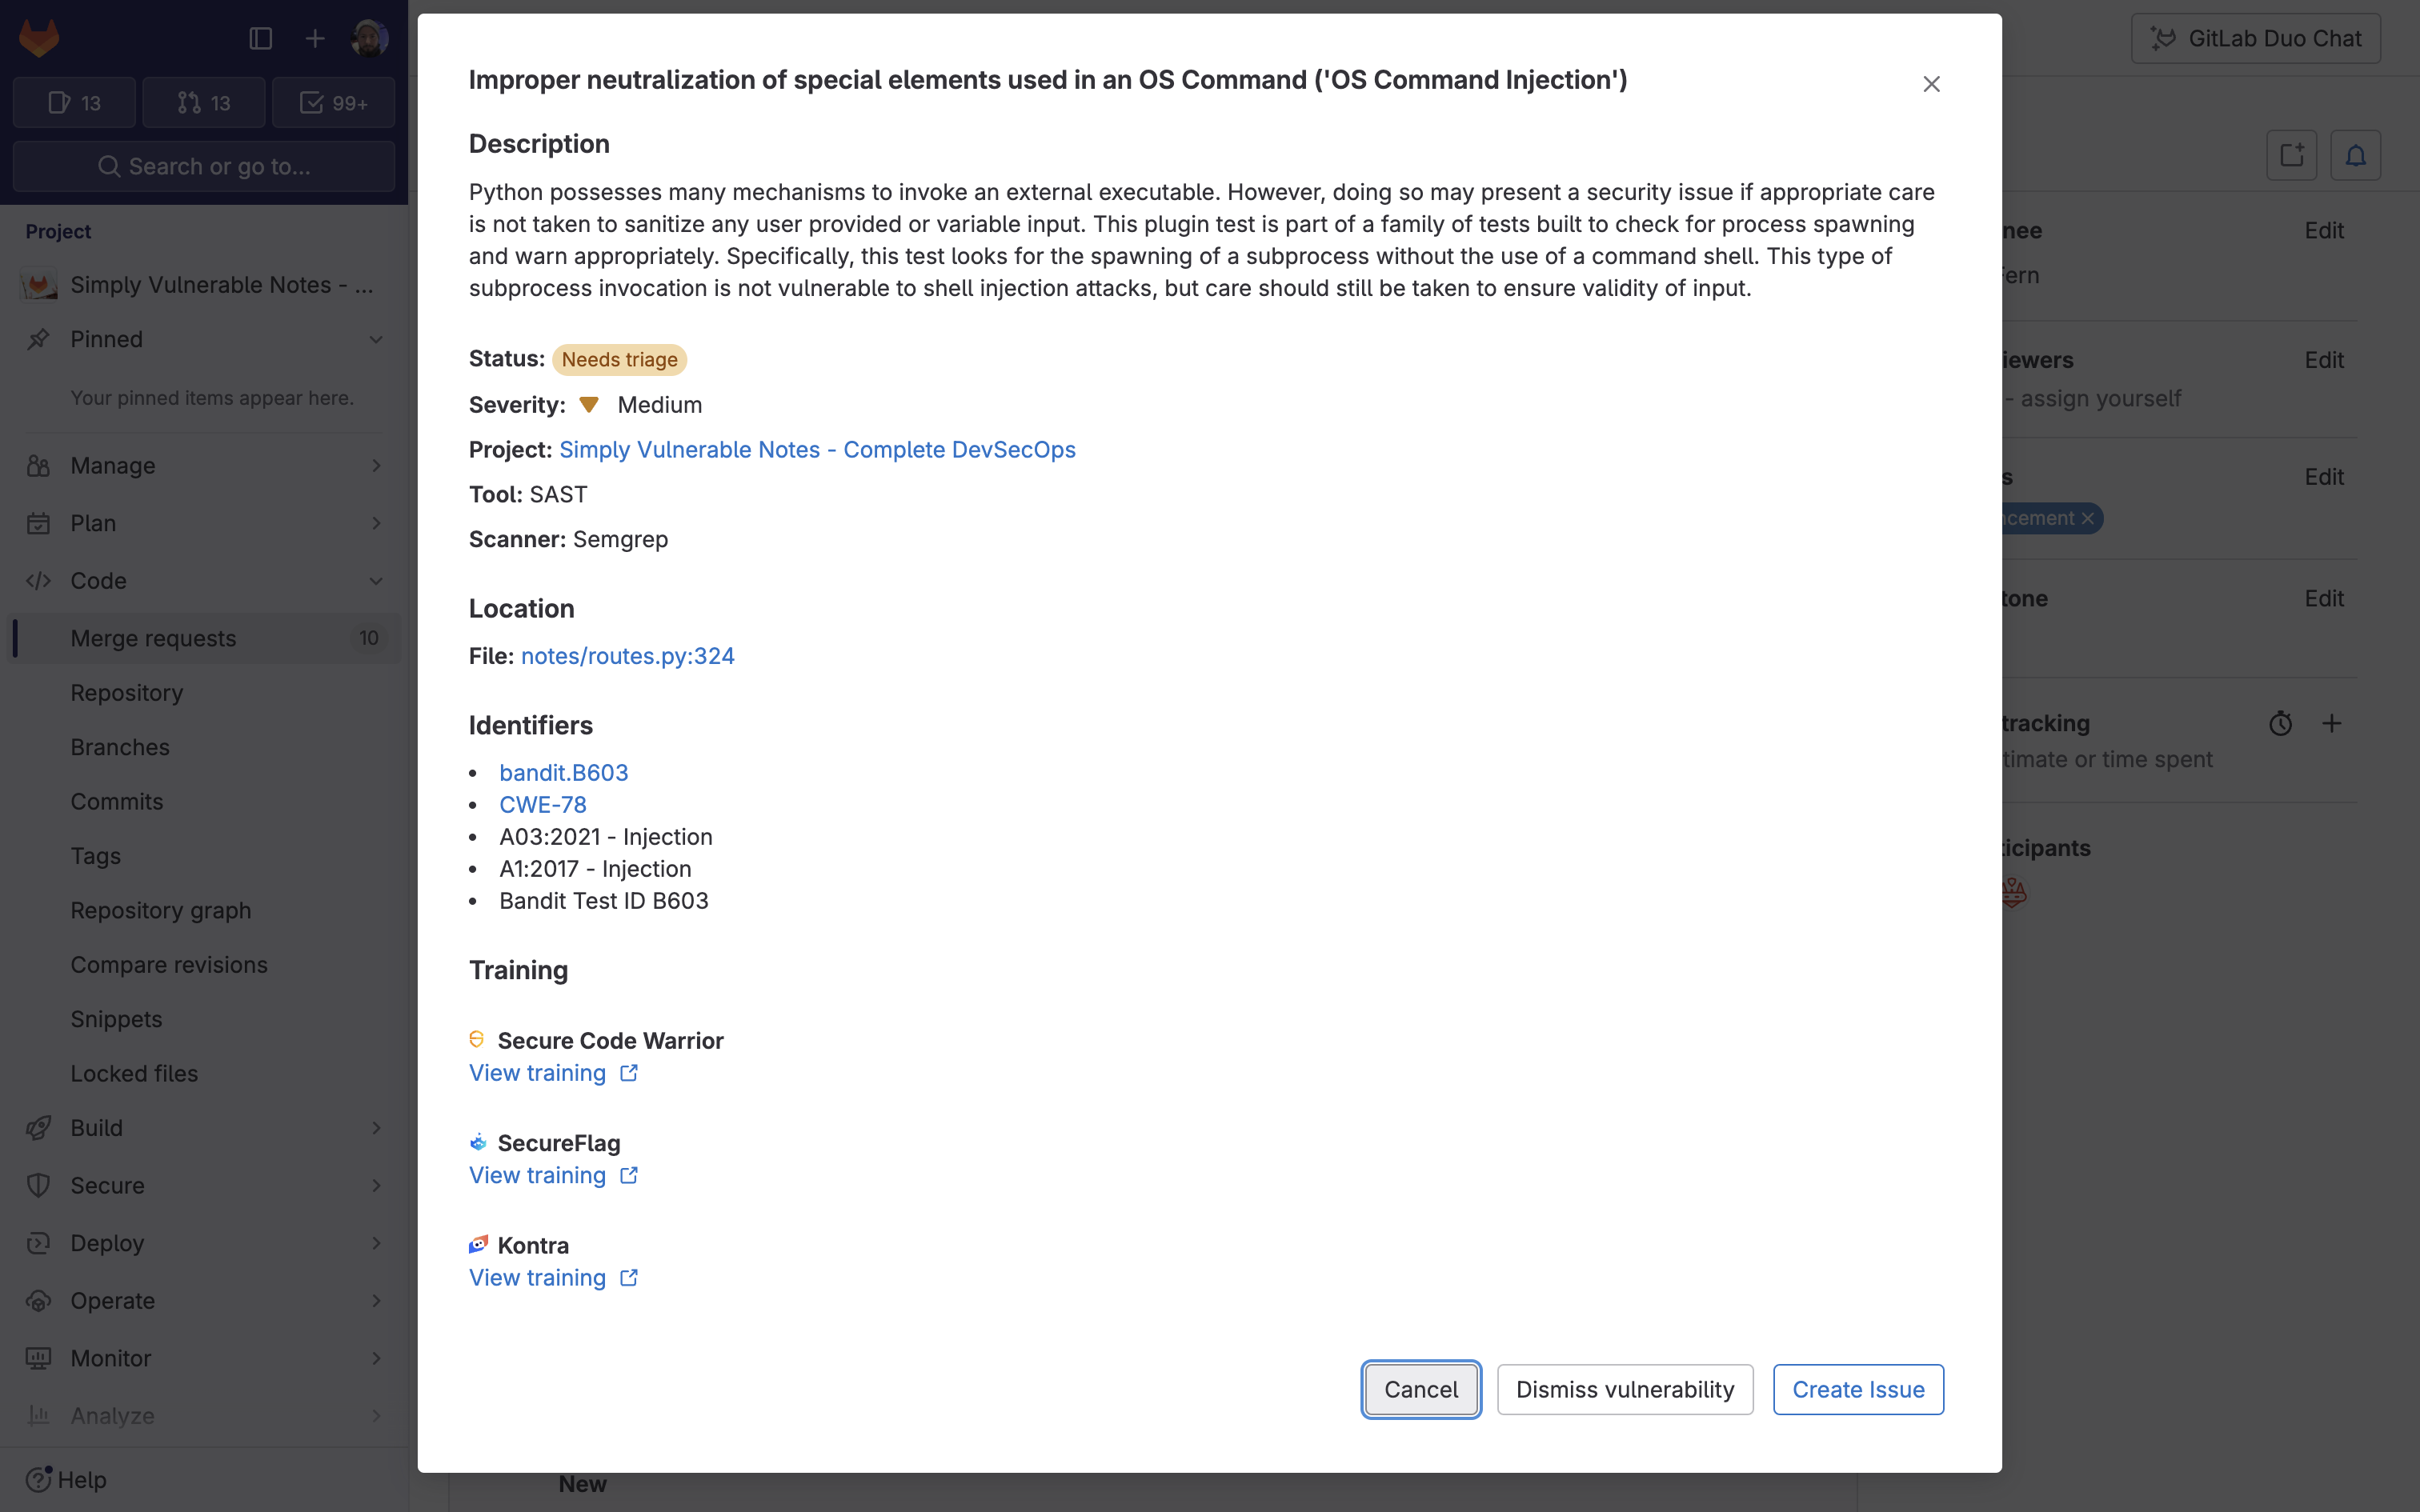
You can take action on these vulnerabilities:
- Dismiss vulnerability: Allows a developer to dismiss the vulnerability with a comment. This assists the security team performing a review.
- Create issue: Allows an issue to be created to keep track of a vulnerability that requires additional oversight.
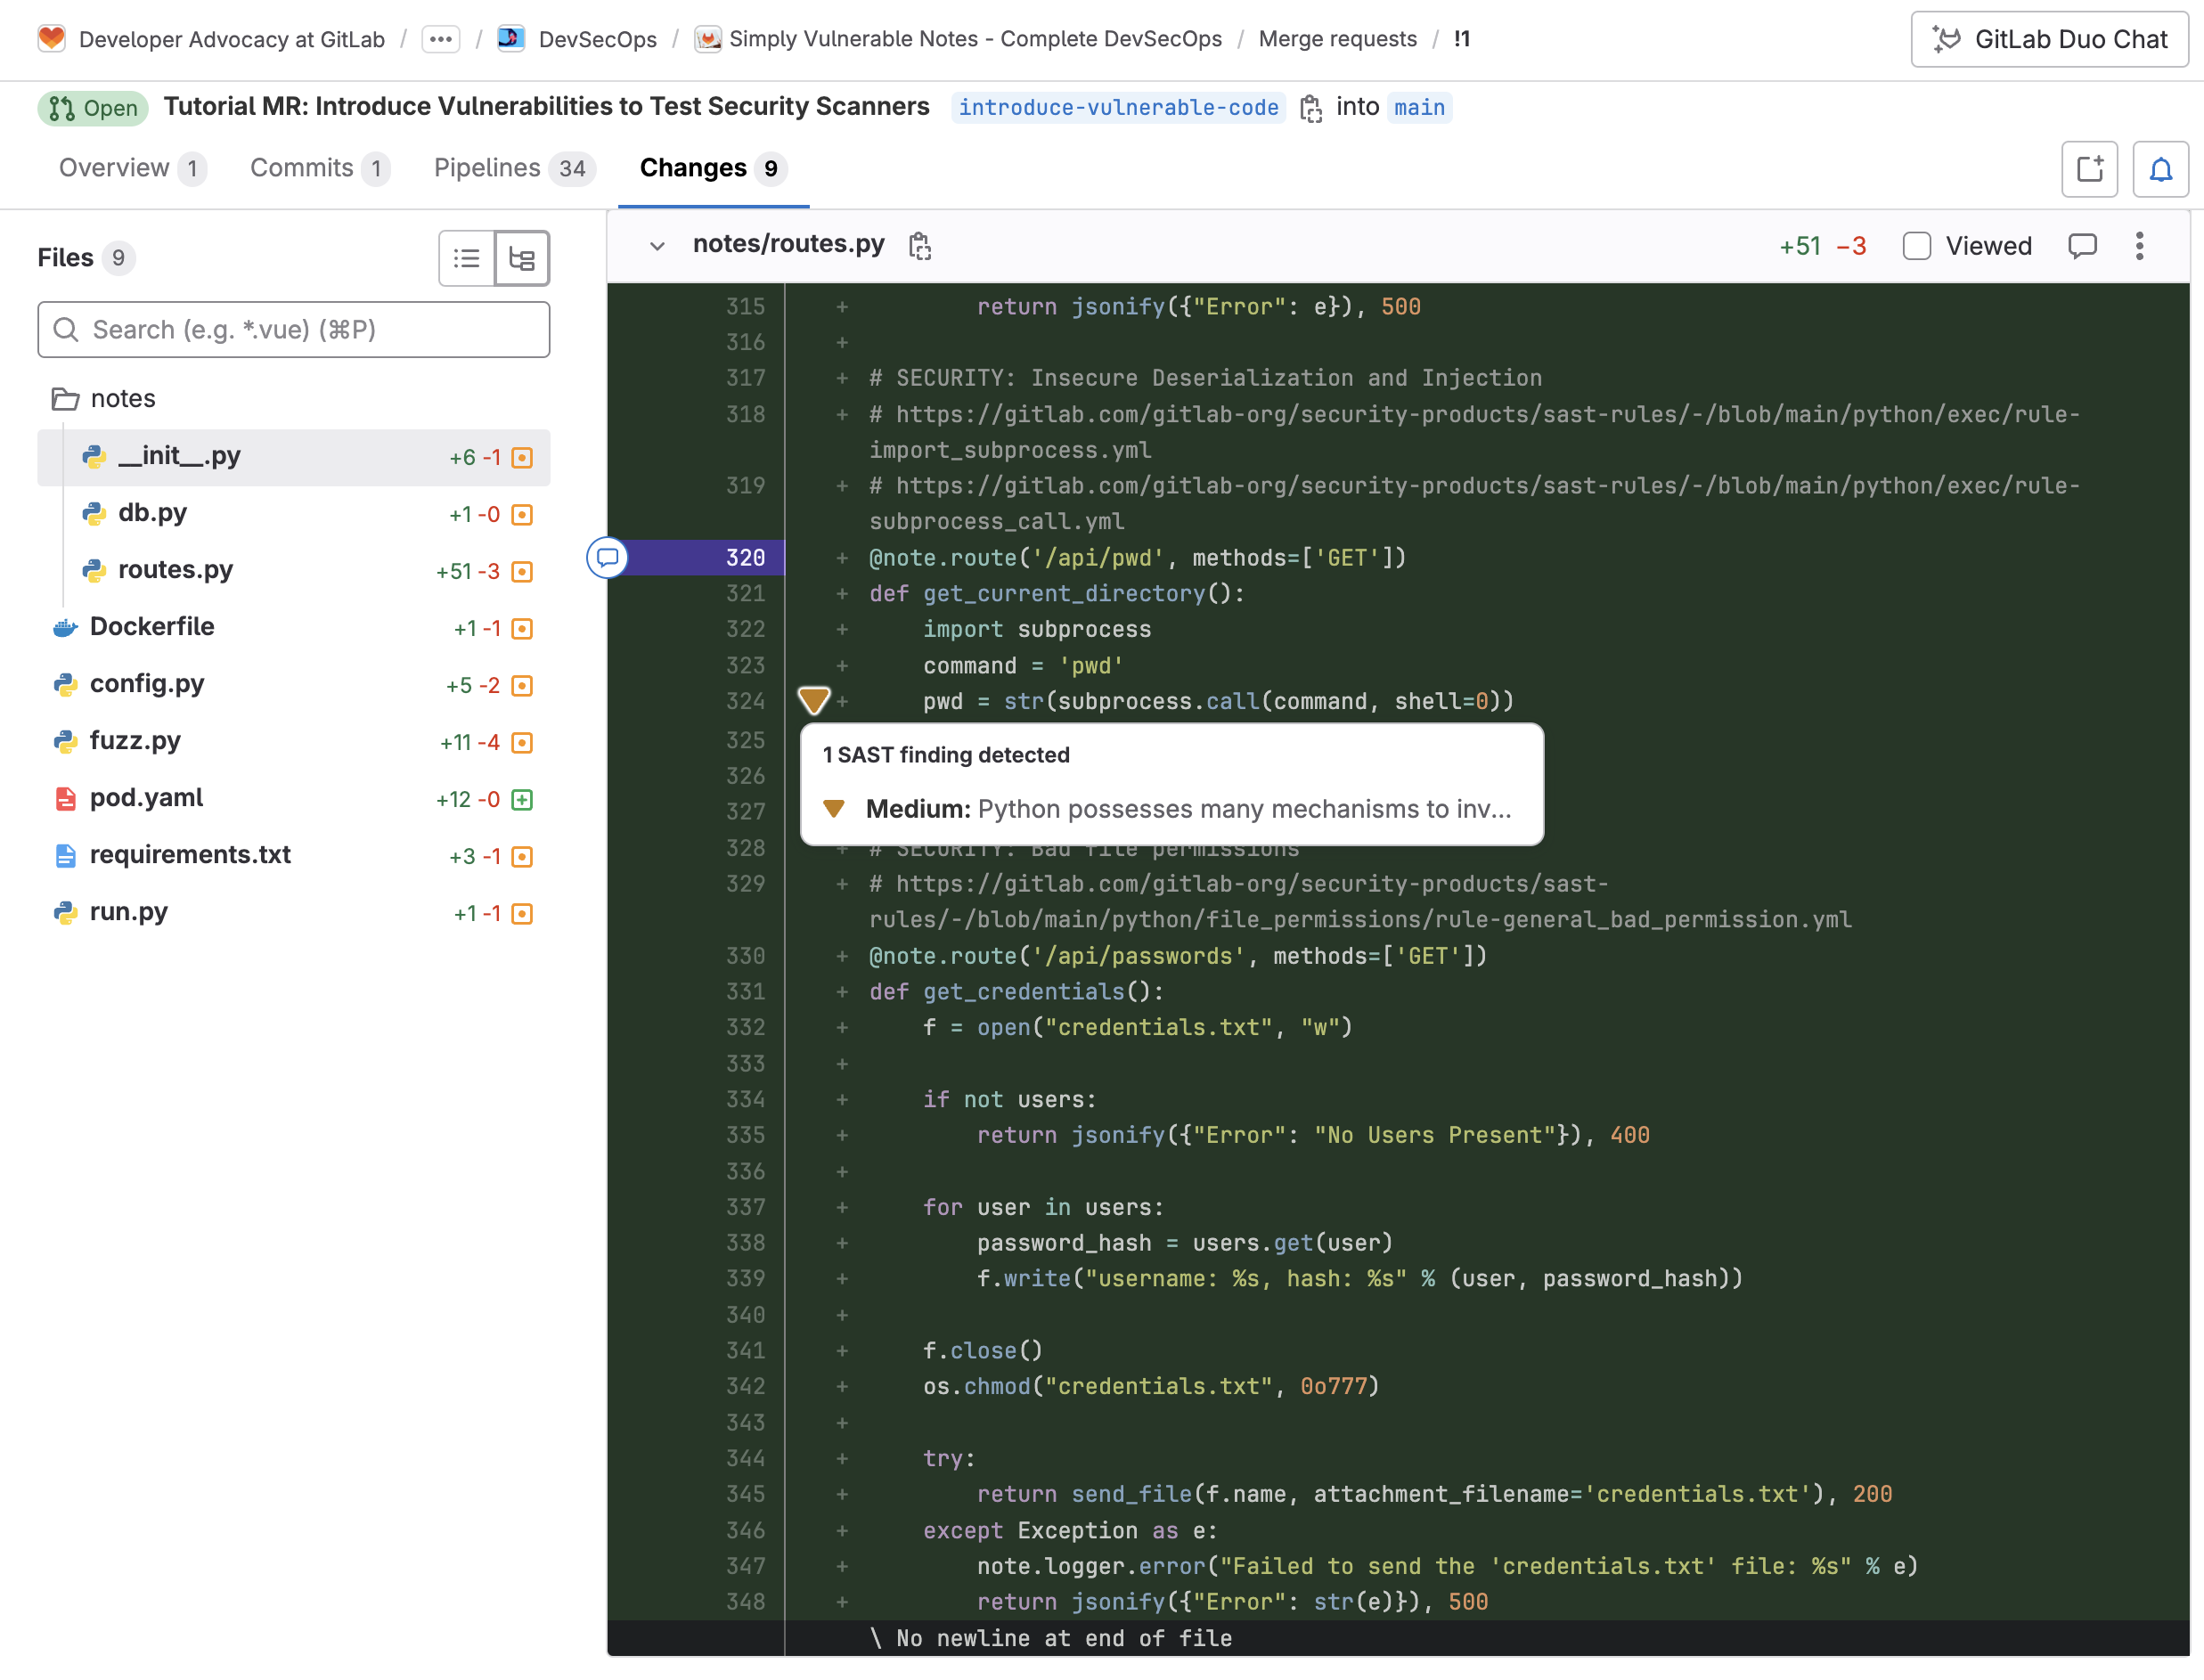
These changes can also be seen inline when changing to the Changes view within the merge request.
Customizing SAST scanners
GitLab allows you to override a SAST job definition so you can change properties like variables, dependencies, or rules. You can do this by declaring a job with the same name as the SAST job to override. Then, place this new job after the template inclusion and specify any additional keys under it.
For example, the following configuration:
- overwrites the version the
semgrep-sastscanner uses - runs a script to fetch modules from private projects before running
gosec-sast - configures all scanners to search at a maximum depth of 10
include:
  - template: Jobs/SAST.gitlab-ci.yml

variables:
  SEARCH_MAX_DEPTH: 10

semgrep-sast:
  variables:
    SAST_ANALYZER_IMAGE_TAG: "3.7"

gosec-sast:
  before_script:
    - |
      cat <<EOF > ~/.netrc
      machine gitlab.com
      login $CI_DEPLOY_USER
      password $CI_DEPLOY_PASSWORD
      EOF
Note: The available SAST jobs can be found in the SAST.gitlab-ci.yml template. Configurations can be found in the Available SAST CI/CD variables documentation.
Customizing SAST rulesets
For each SAST analyzer, GitLab processes the code then uses rules to find possible weaknesses in source code. These rules determine what types of weaknesses the scanner reports.
- For Semgrep-based SAST scanners, GitLab creates, maintains, and supports the rules that are used. It combines the Semgrep open source engine, GitLab-managed detection rules, and GitLab proprietary technology for vulnerability tracking and false positive detection.
- For other SAST analyzers, the rules are defined in the upstream projects for each scanner.
You can customize the behavior of the SAST scanners by defining a ruleset configuration file in the repository being scanned:
- Disable predefined rules (available for all analyzers)
- Override predefined rules (available for all analyzers)
- Replace predefined rules by synthesizing a custom configuration using passthroughs
For more information and examples on configuring SAST rules, see the SAST rules and Customizing rulesets documentation.
Secret scanning
GitHub provides secret scanning, which can find, block, and revoke leaked secrets. The same can be done within GitLab by enabling Secret Detection.
To enable Secret Detection in GitLab, you can simply add the following template to your .gitlab-ci.yml:
include:
  - template: Jobs/Secret-Detection.gitlab-ci.yml
Once the template has been added, any time new code is checked in (or a pipeline is run), the secret scanner will scan the source code for known secrets. Pipeline Secret Detection scans different aspects of your code, depending on the situation. For all methods except the “Default branch”, Pipeline Secret Detection scans commits, not the working tree. See the Secret detection coverage documentation to learn more about how secret scanning works.
When creating a merge request, Secret Detection scans every commit made on the source branch. Just like in SAST, each detected vulnerability provides the following information (such as location) and identifiers to assist with the remediation process:
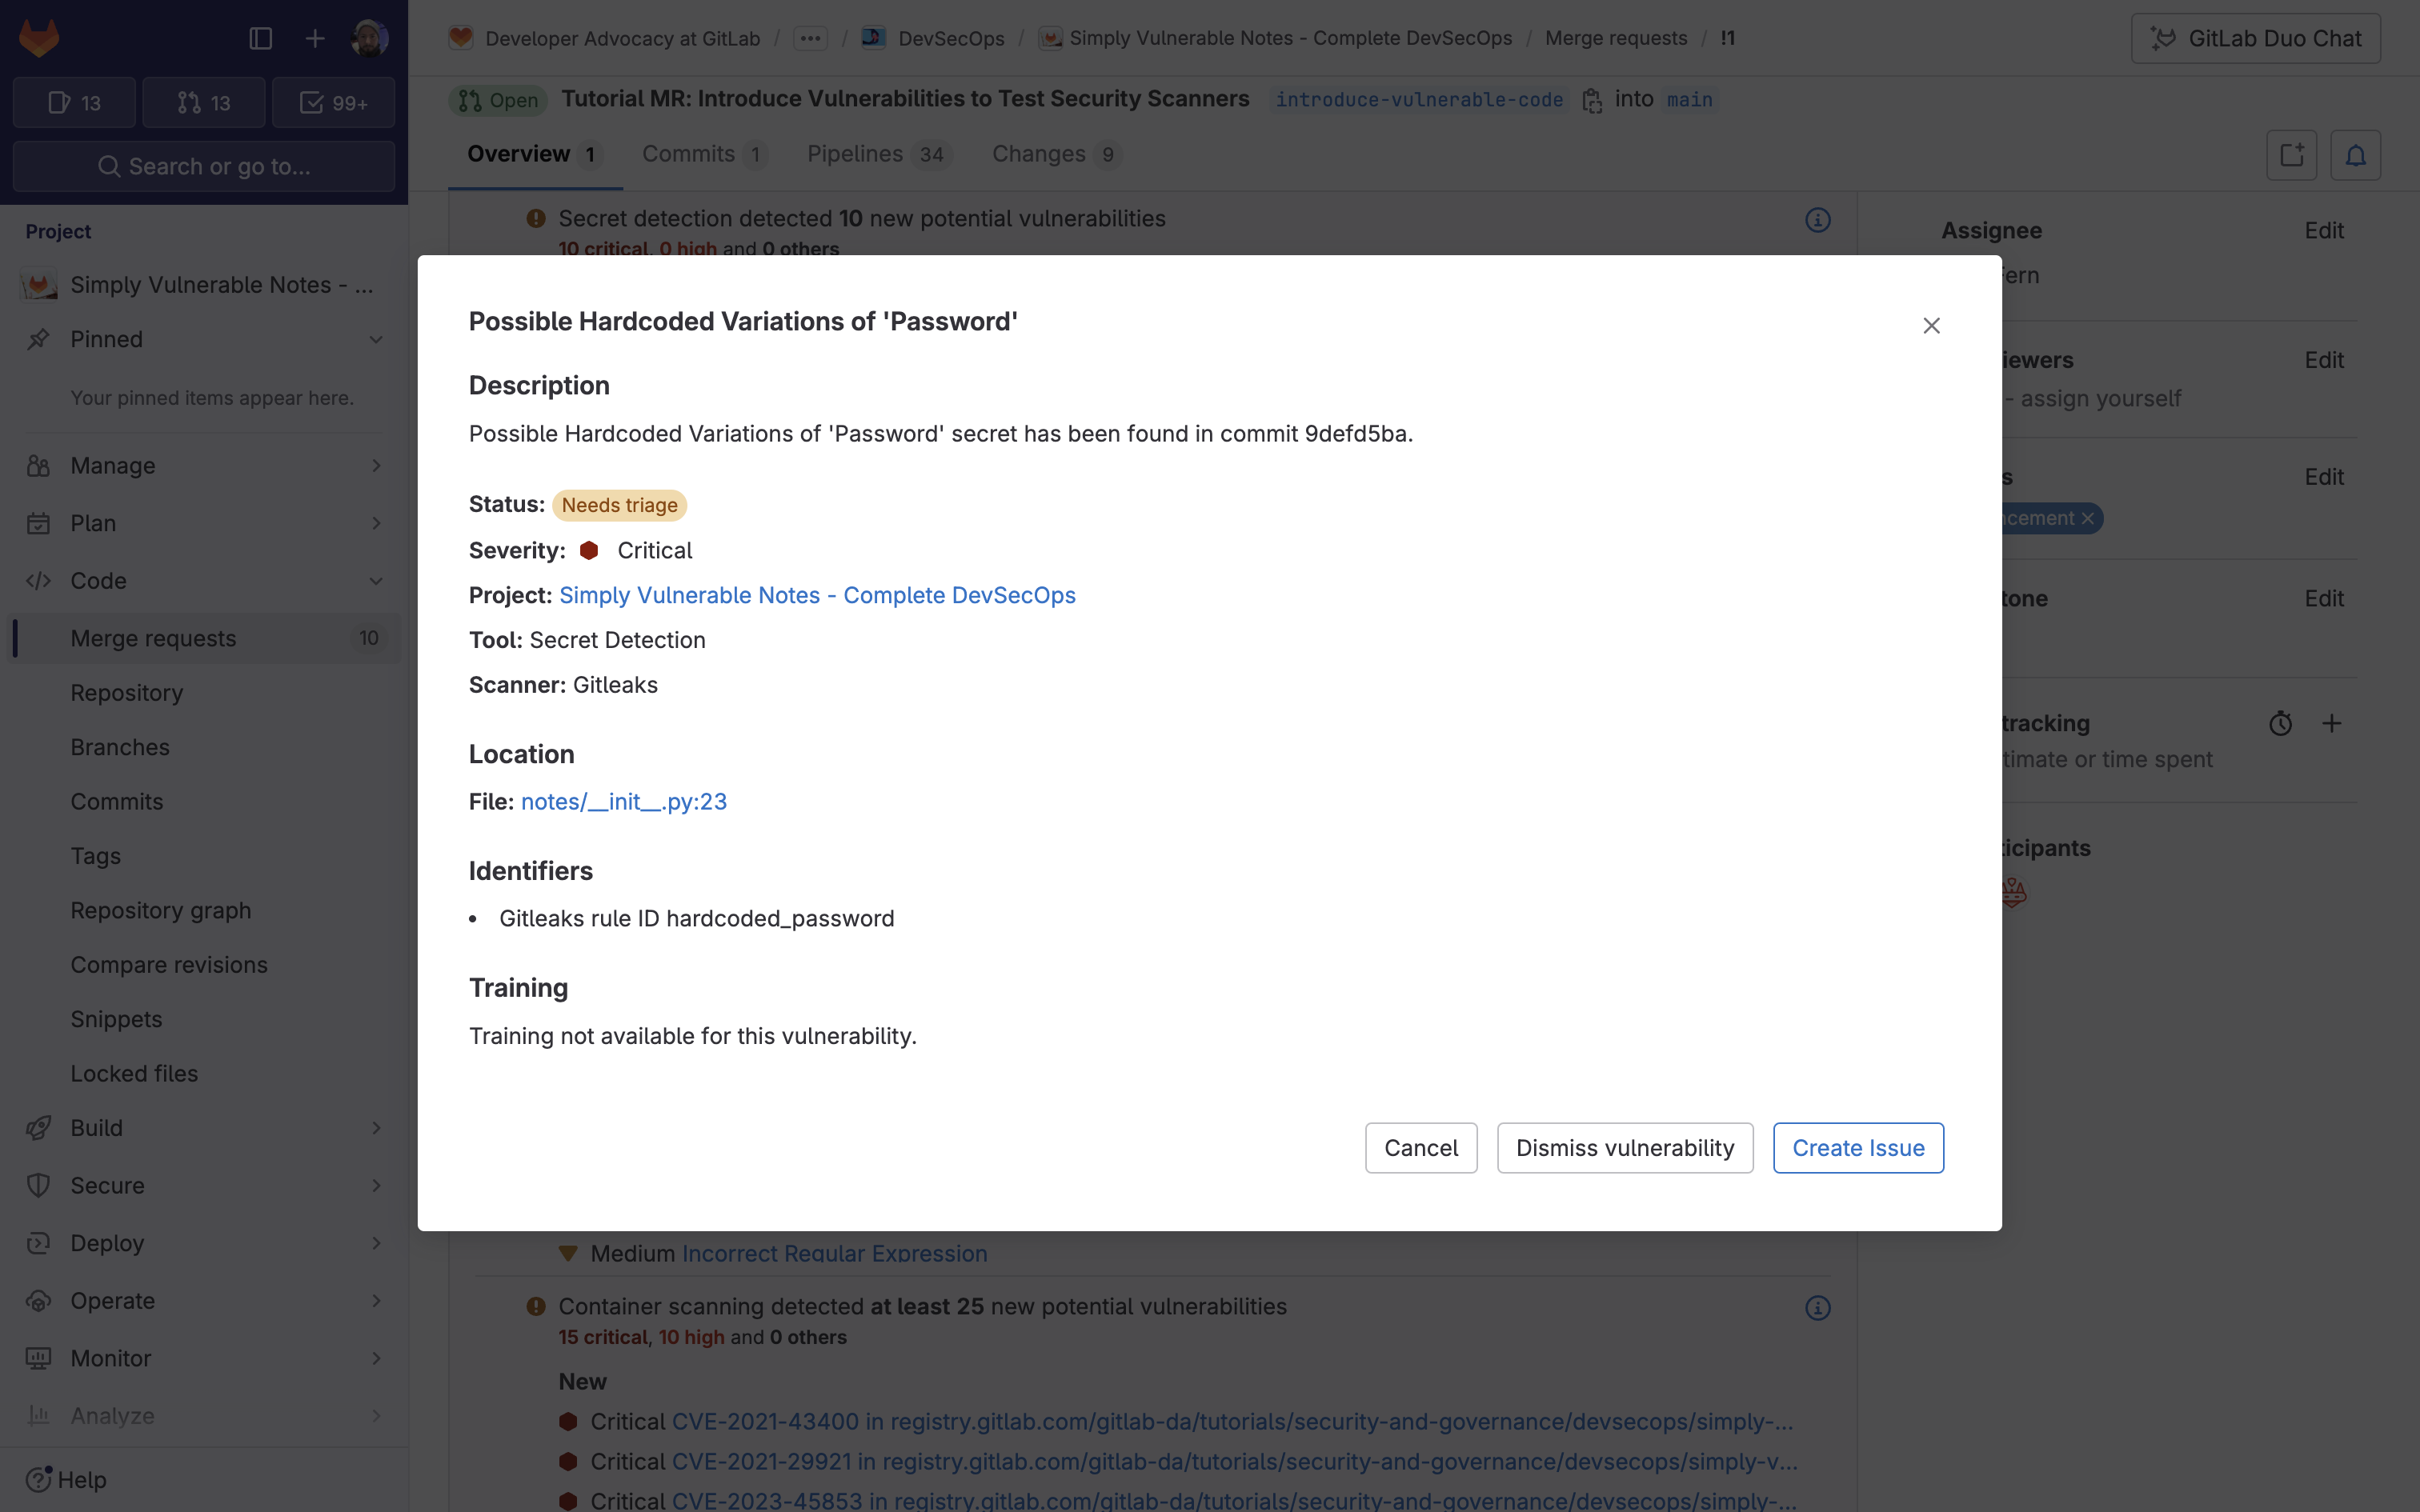
Similar to SAST, you can take action on these vulnerabilities straight from the merge request, including dismissing vulnerabilities, and creating issues.
Customizing Secret Detection jobs
GitLab allows you to override a Secret Detection job definition so you change properties like variables, dependencies, or rules. You can do this by declaring a job with the same name as the Secret Detection job. Then place this new job after the template inclusion and specify any additional keys under it. For example, the following configuration:
- overwrites the stage the secret detection job runs on to
security - enables the historic scanning
- changes the Secrets Analyzer version to 4.5
include:
  - template: Jobs/Secret-Detection.gitlab-ci.yml

secret_detection:
  stage: security
  variables:
    SECRET_DETECTION_HISTORIC_SCAN: "true"
    SECRETS_ANALYZER_VERSION: "4.5"
Note: The available Secret Detection jobs can be found in the SAST.gitlab-ci.yml template. Available configurations can be found in the Available Secret Detection CI/CD variables documentation.
Customizing Secret Detection rulesets
The Secret Detection analyzer allows you to customize which secrets are reported in the GitLab UI. The following customization options can be used separately, or in combination:
- disable predefined rules
- override predefined rules
- synthesize a custom configuration
- specify a remote configuration file
For example, by creating the file .gitlab/secret-detection-ruleset.toml, in the root directory of your project, the default GitLeaks package is extended to ignore test tokens from detection:
### extended-gitleaks-config.toml
title = "extension of gitlab's default gitleaks config"

[extend]
### Extends default packaged path
path = "/gitleaks.toml"

[allowlist]
  description = "allow list of test tokens to ignore in detection"
  regexTarget = "match"
  regexes = [
    '''glpat-1234567890abcdefghij''',
  ]
For more information on overriding the predefined analyzer rules, check out the Secret Detection documentation.
Automatic response to leaked secrets
GitLab Secret Detection automatically responds when it finds certain types of leaked secrets. Automatic responses can:
- automatically revoke the secret
- notify the partner that issued the secret and the partner can then revoke the secret, notify its owner, or otherwise protect against abuse
GitLab can also notify partners when credentials they issue are leaked in public repositories on GitLab.com. If you operate a cloud or SaaS product and you’re interested in receiving these notifications, you can implement a Partner API, which is called by the GitLab Token Revocation API.
See the Automatic response to leaked secrets documentation to learn more.
Supply chain security
GitHub enables you to secure, manage, and report on software supply chains with automated security and version updates and one-click SBOMs. GitLab can meet your supply chain security needs using the Dependency Scanning and Dependency List (SBOM) features.
To enable Dependency Scanning in GitLab, you can simply add the following template to your .gitlab-ci.yml:
include:
  - template: Jobs/Dependency-Scanning.gitlab-ci.yml
Once the template has been added, any time new code is checked in, Dependency Scanning will auto-detect the package managers used in your project. It will then scan the dependencies used for known vulnerabilities.
Dependency Scanning results of the diff between the feature-branch and the target-branch display in the merge request widget. The merge request widget displays Dependency Scanning results and resolutions that were introduced by the changes made in the merge request. Within a merge request, each vulnerability displays relevant information to assist with remediation such as identifiers, evidence, and solutions:
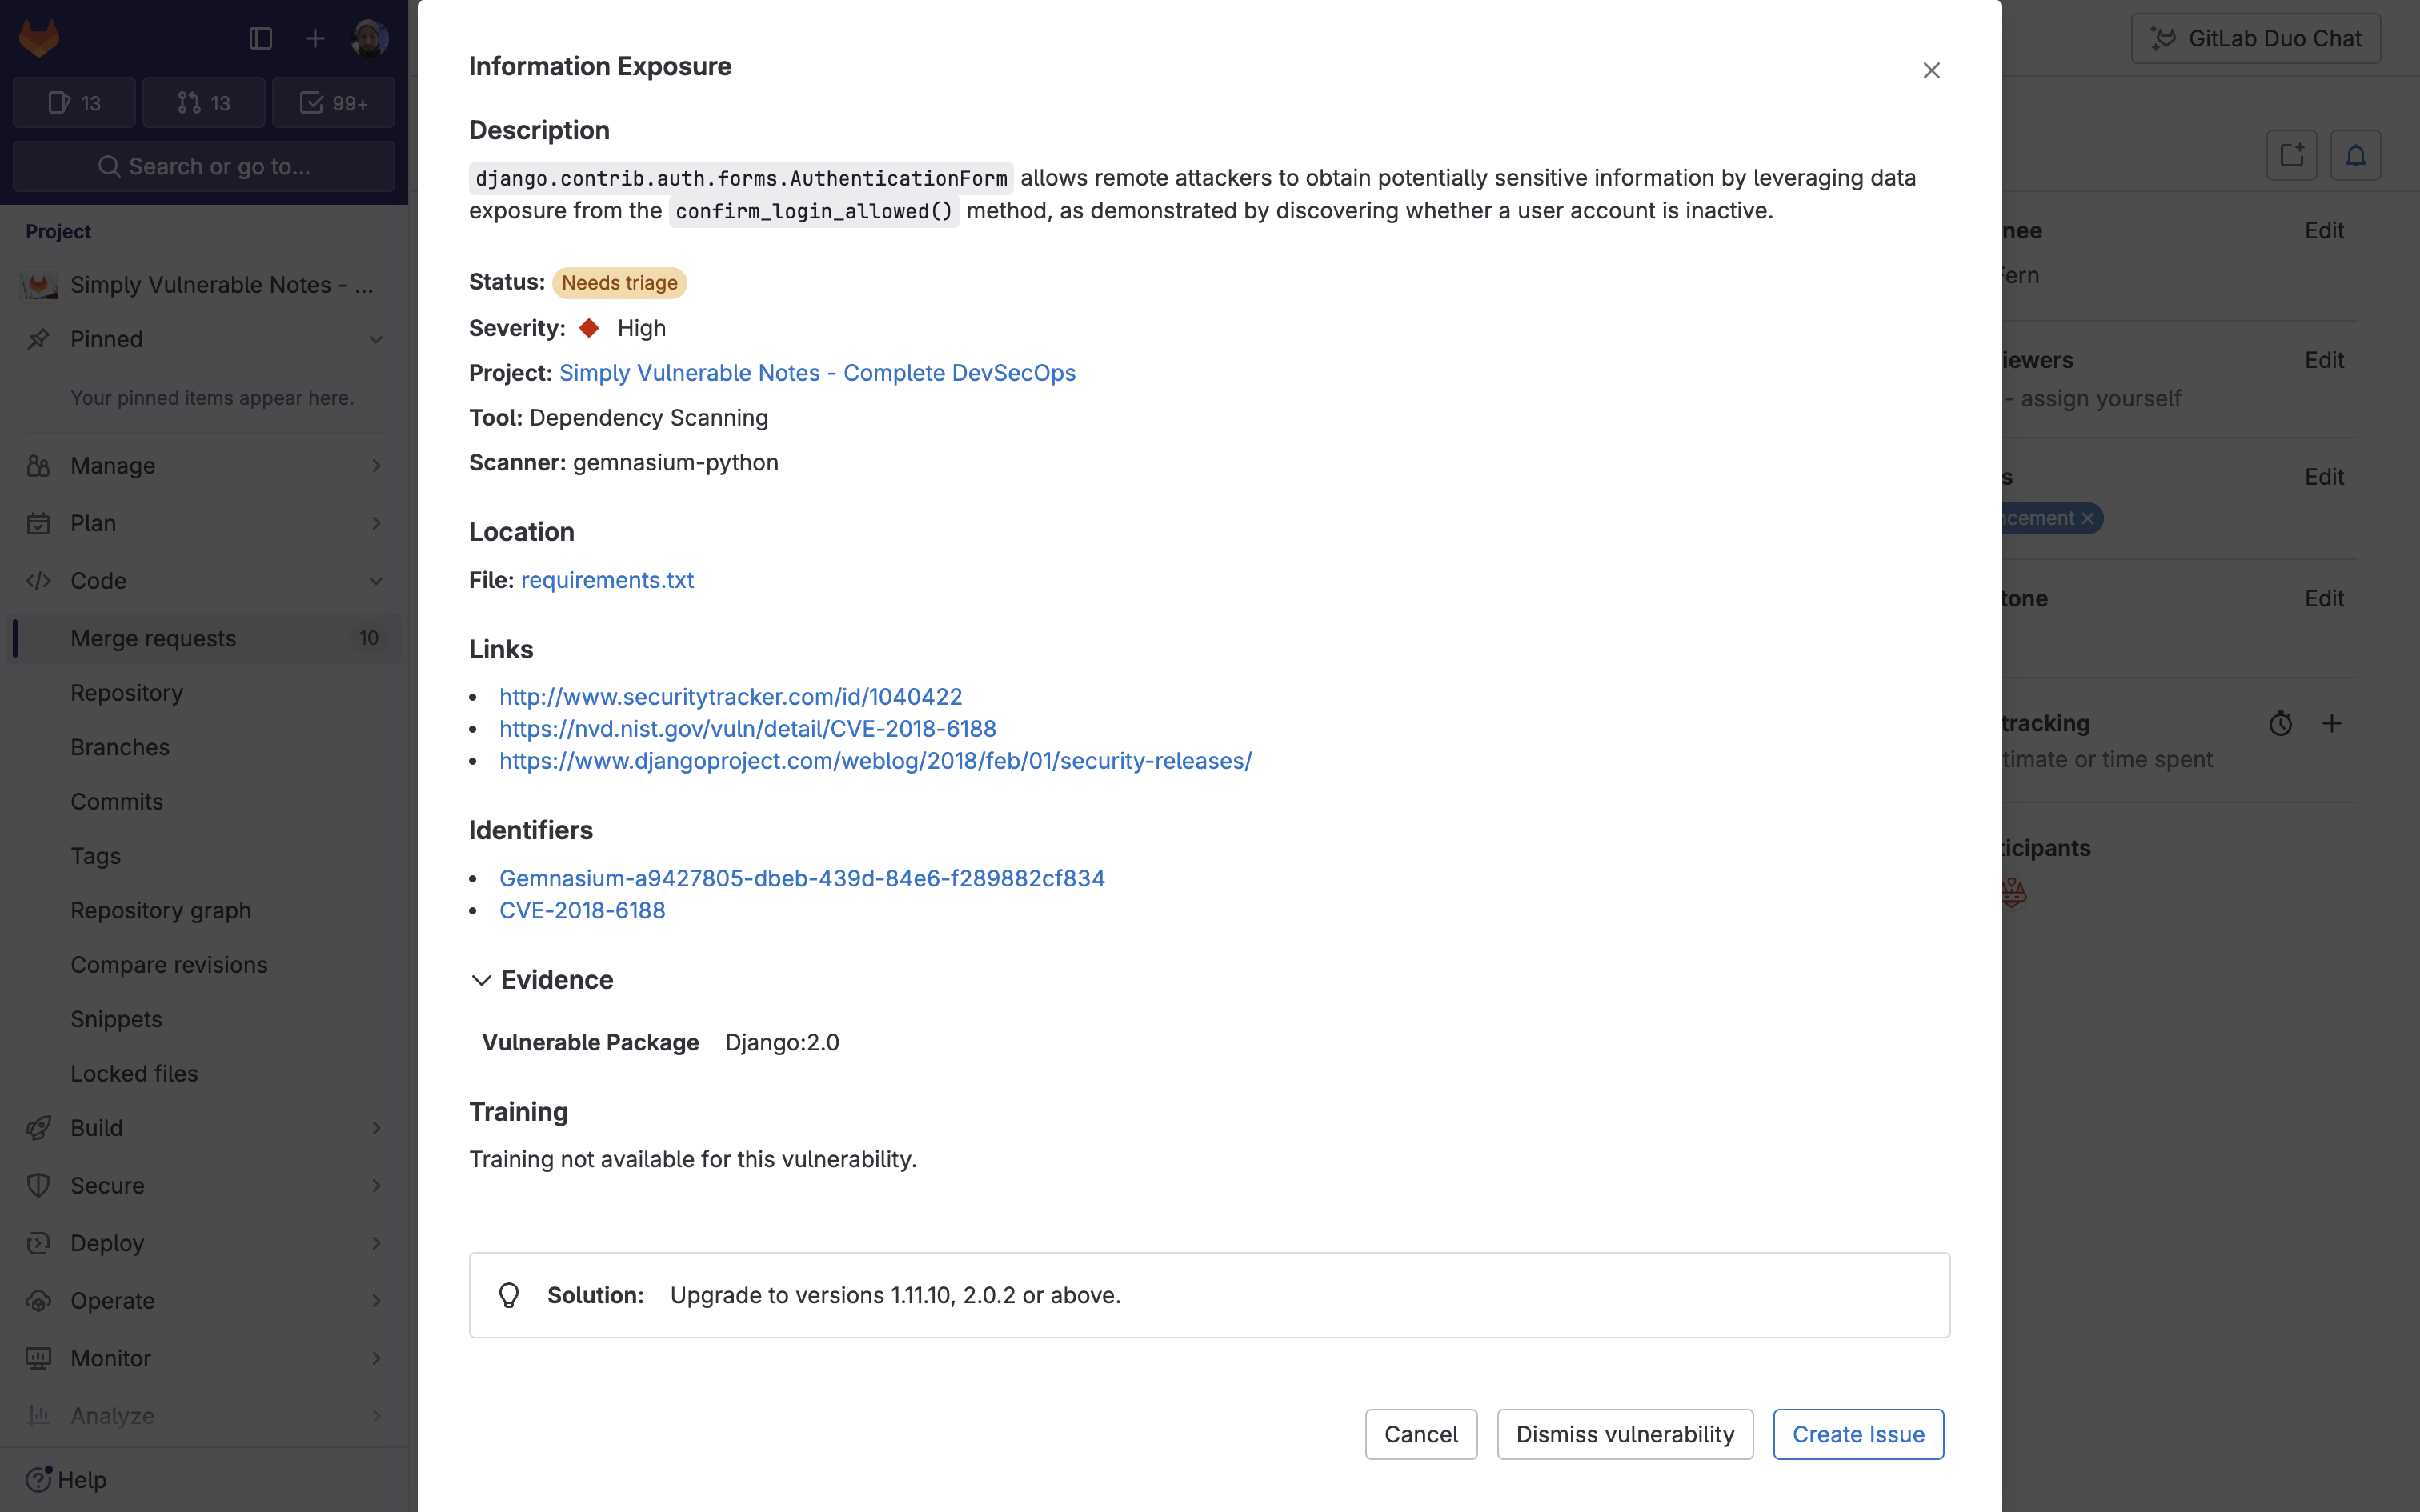
Similar to SAST and Secret Detection, you can take action on these vulnerabilities straight from the merge request, including dismissing vulnerabilities and creating issues.
Configuring Dependency Scanning
To override a job definition (for example, to change properties like variables or dependencies), declare a new job with the same name as the one to override. Place this new job after the template inclusion and specify any additional keys under it. For example, the following code:
- disables automatic remediation of vulnerable dependencies
- requires a build job to complete before Dependency Scanning
include:
  - template: Jobs/Dependency-Scanning.gitlab-ci.yml

gemnasium-dependency_scanning:
  variables:
    DS_REMEDIATE: "false"
  dependencies: ["build"]
To learn more about configuring the dependency scanners, see the Customizing analyzer behavior documentation.
Generating an SBOM
GitLab provides a Dependency List (SBOM) to review your project or group dependencies and key details about those dependencies, including their known vulnerabilities. This list is a collection of dependencies in your project, including existing and new findings. The Dependency List is generated after the dependency scanner runs successfully on the default branch. To access the Dependency List:
- On the left sidebar, select Search or go to and find your project.
- Select Secure > Dependency List.
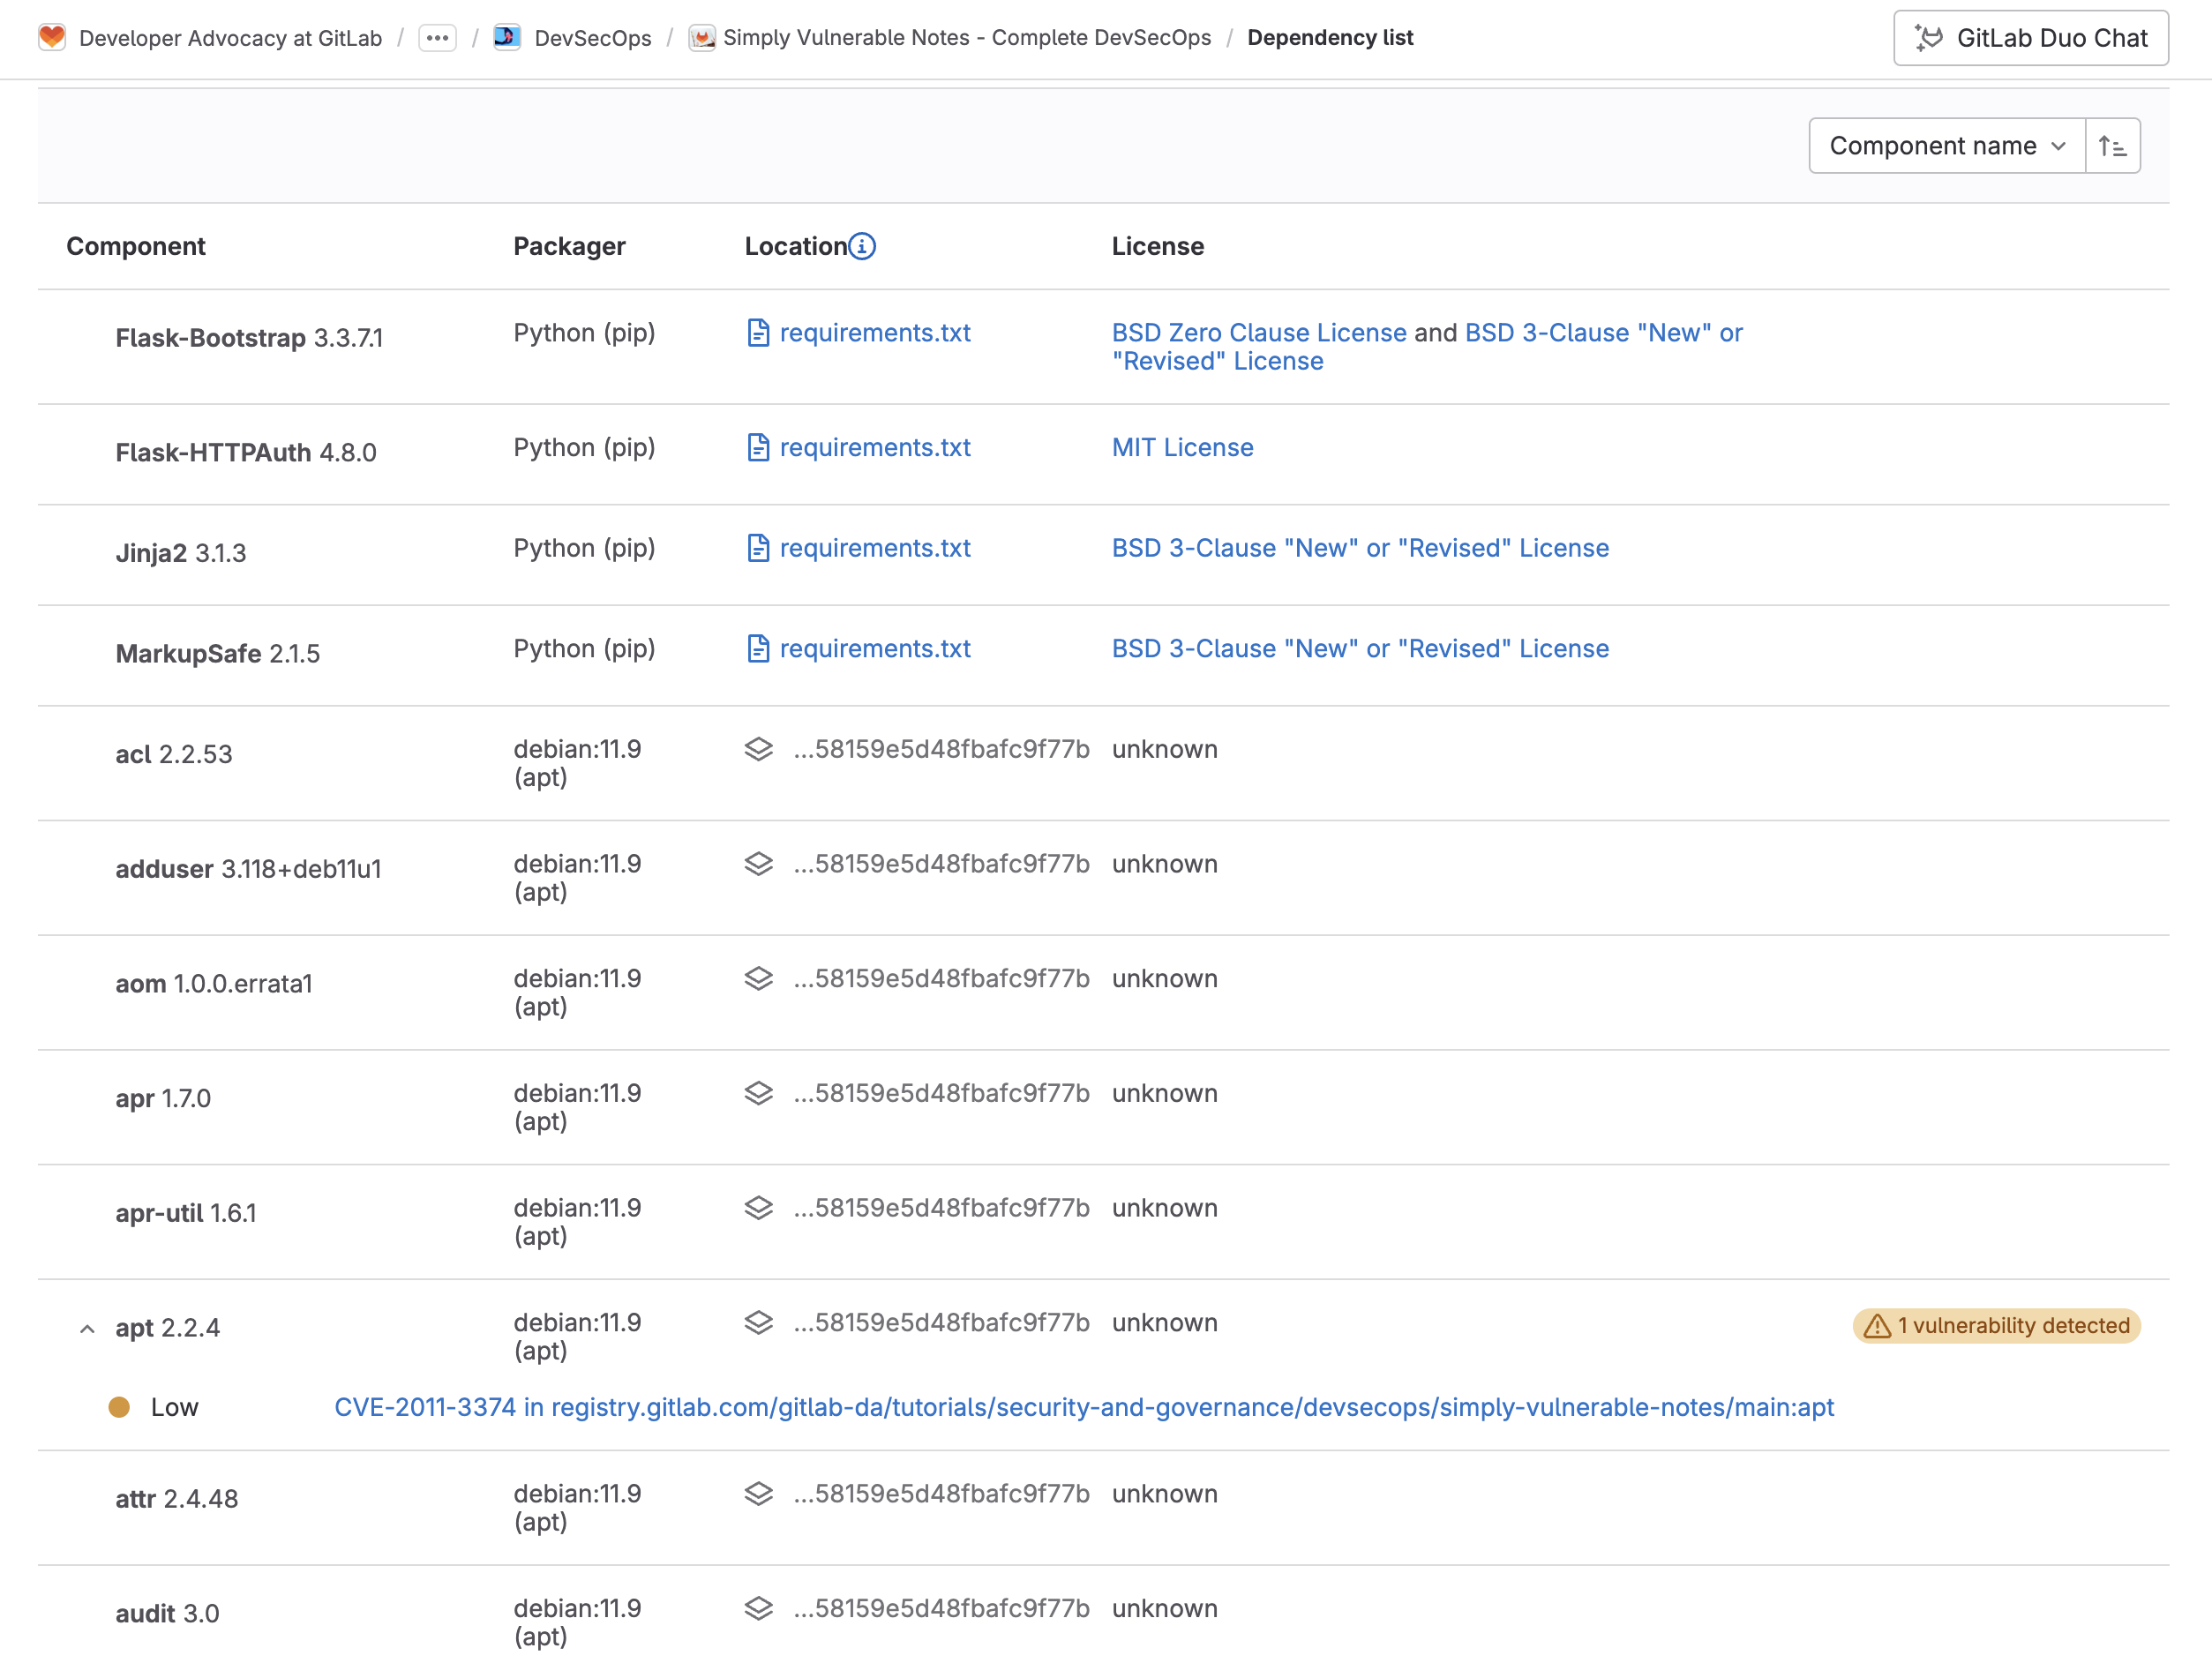
From here you can see the following information on your dependencies:
| Field | Description |
|---|---|
| Component | The dependency’s name and version. |
| Packager | The packager used to install the dependency. |
| Location | For system dependencies, this lists the image that was scanned. For application dependencies, this shows a link to the packager-specific lock file in your project that declared the dependency. It also shows the dependency path to a top-level dependency, if any, and if supported. |
| License | Links to dependency’s software licenses. A warning badge that includes the number of vulnerabilities detected in the dependency. |
| Projects | Links to the project with the dependency. If multiple projects have the same dependency, the total number of these projects is shown. To go to a project with this dependency, select the Project's number, then search for and select its name. The project search feature is supported only on groups that have up to 600 occurrences in their group hierarchy. |
See the Dependency List documentation to learn more.
Security and compliance administration
GitHub Advanced Security allows you to view security metrics and insights and assess code security risk. Now let’s examine how to do the same with GitLab Ultimate.
Viewing security metrics and insights
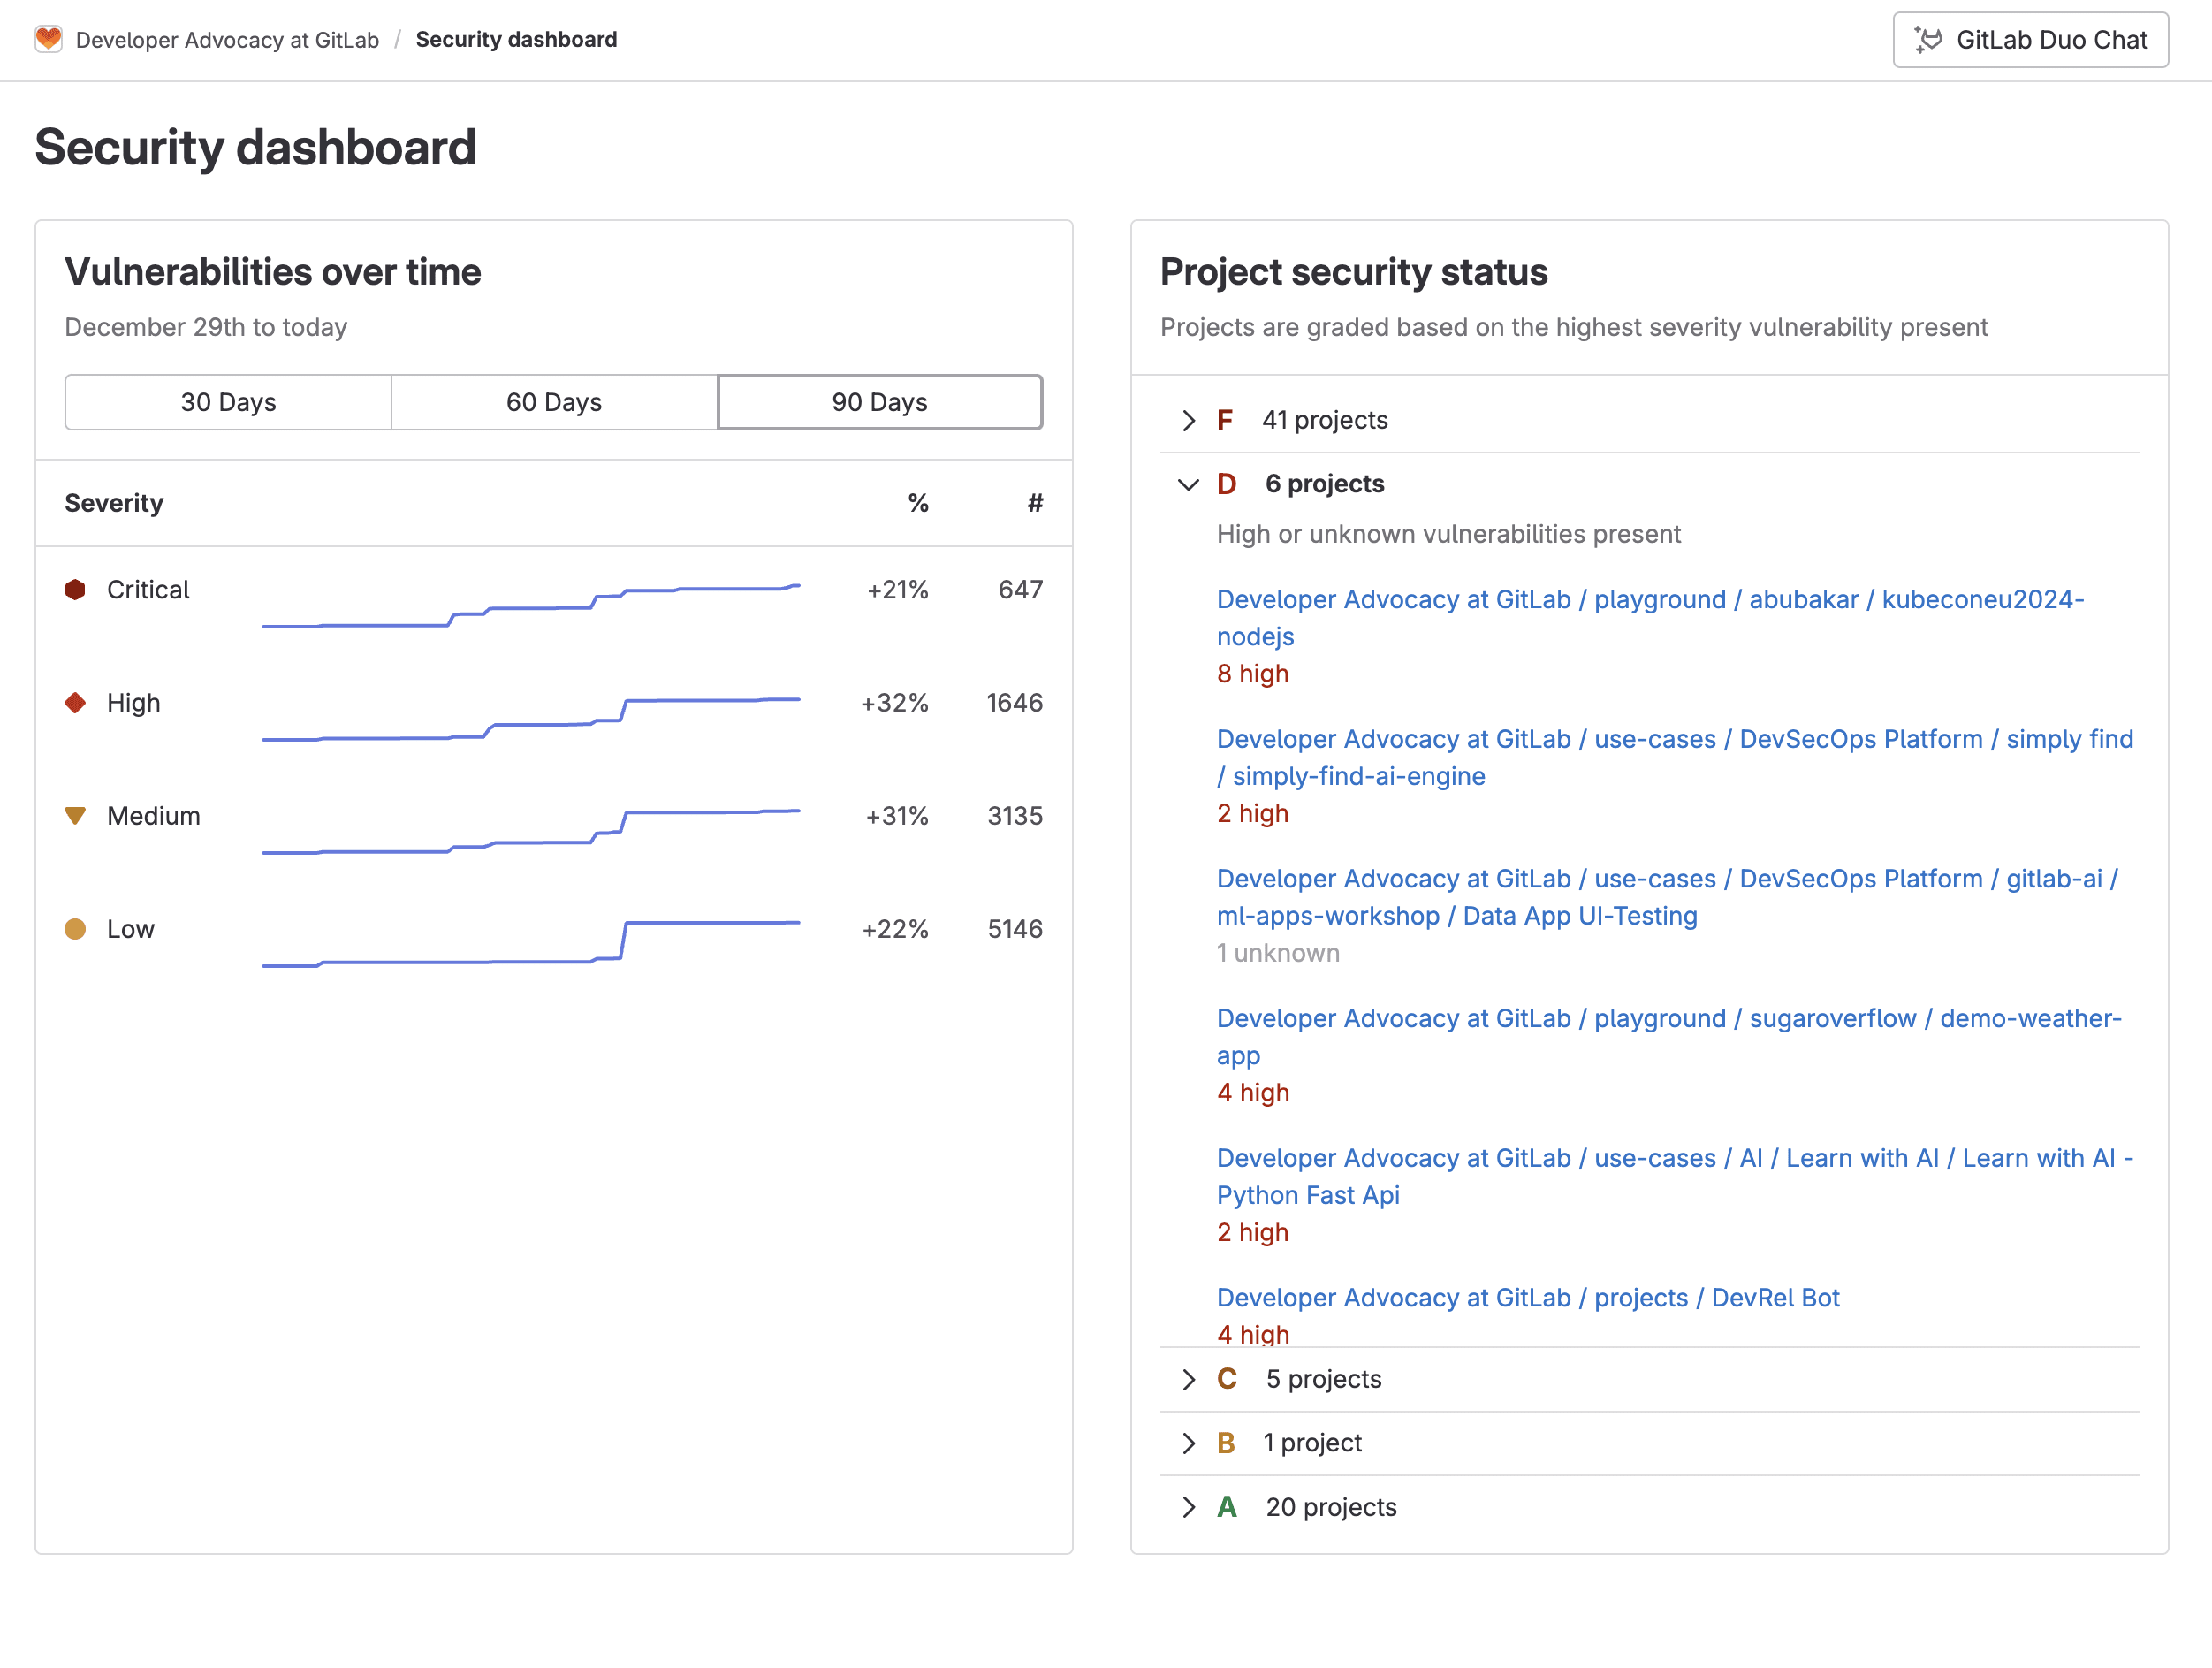
GitLab provides Security dashboards to help assess the security posture of your applications. These dashboards display a collection of metrics, ratings, and charts for the vulnerabilities detected by the security scanners run on your project:
- vulnerability trends over a 30-, 60-, or 90-day timeframe for all projects in a group
- a letter grade rating for each project based on vulnerability severity
- the total number of vulnerabilities detected within the past 365 days, including their severity
To access the Security dashboard:
- On the left sidebar, select Search or go to and find your project or group.
- From the side tab, select Secure > Security dashboard.
- Filter and search for what you need.
The group view displays your security posture for all projects in your group:
The project view displays your security posture for just the project:

Assess code security risk
GitLab Ultimate features a Vulnerability Report, which provides information about vulnerabilities from scans of the default branch. It contains cumulative results of all successful jobs, regardless of whether the pipeline was successful. At all levels, the Vulnerability Report contains:
- totals of vulnerabilities per severity level
- filters for common vulnerability attributes
- details of each vulnerability, presented in tabular layout
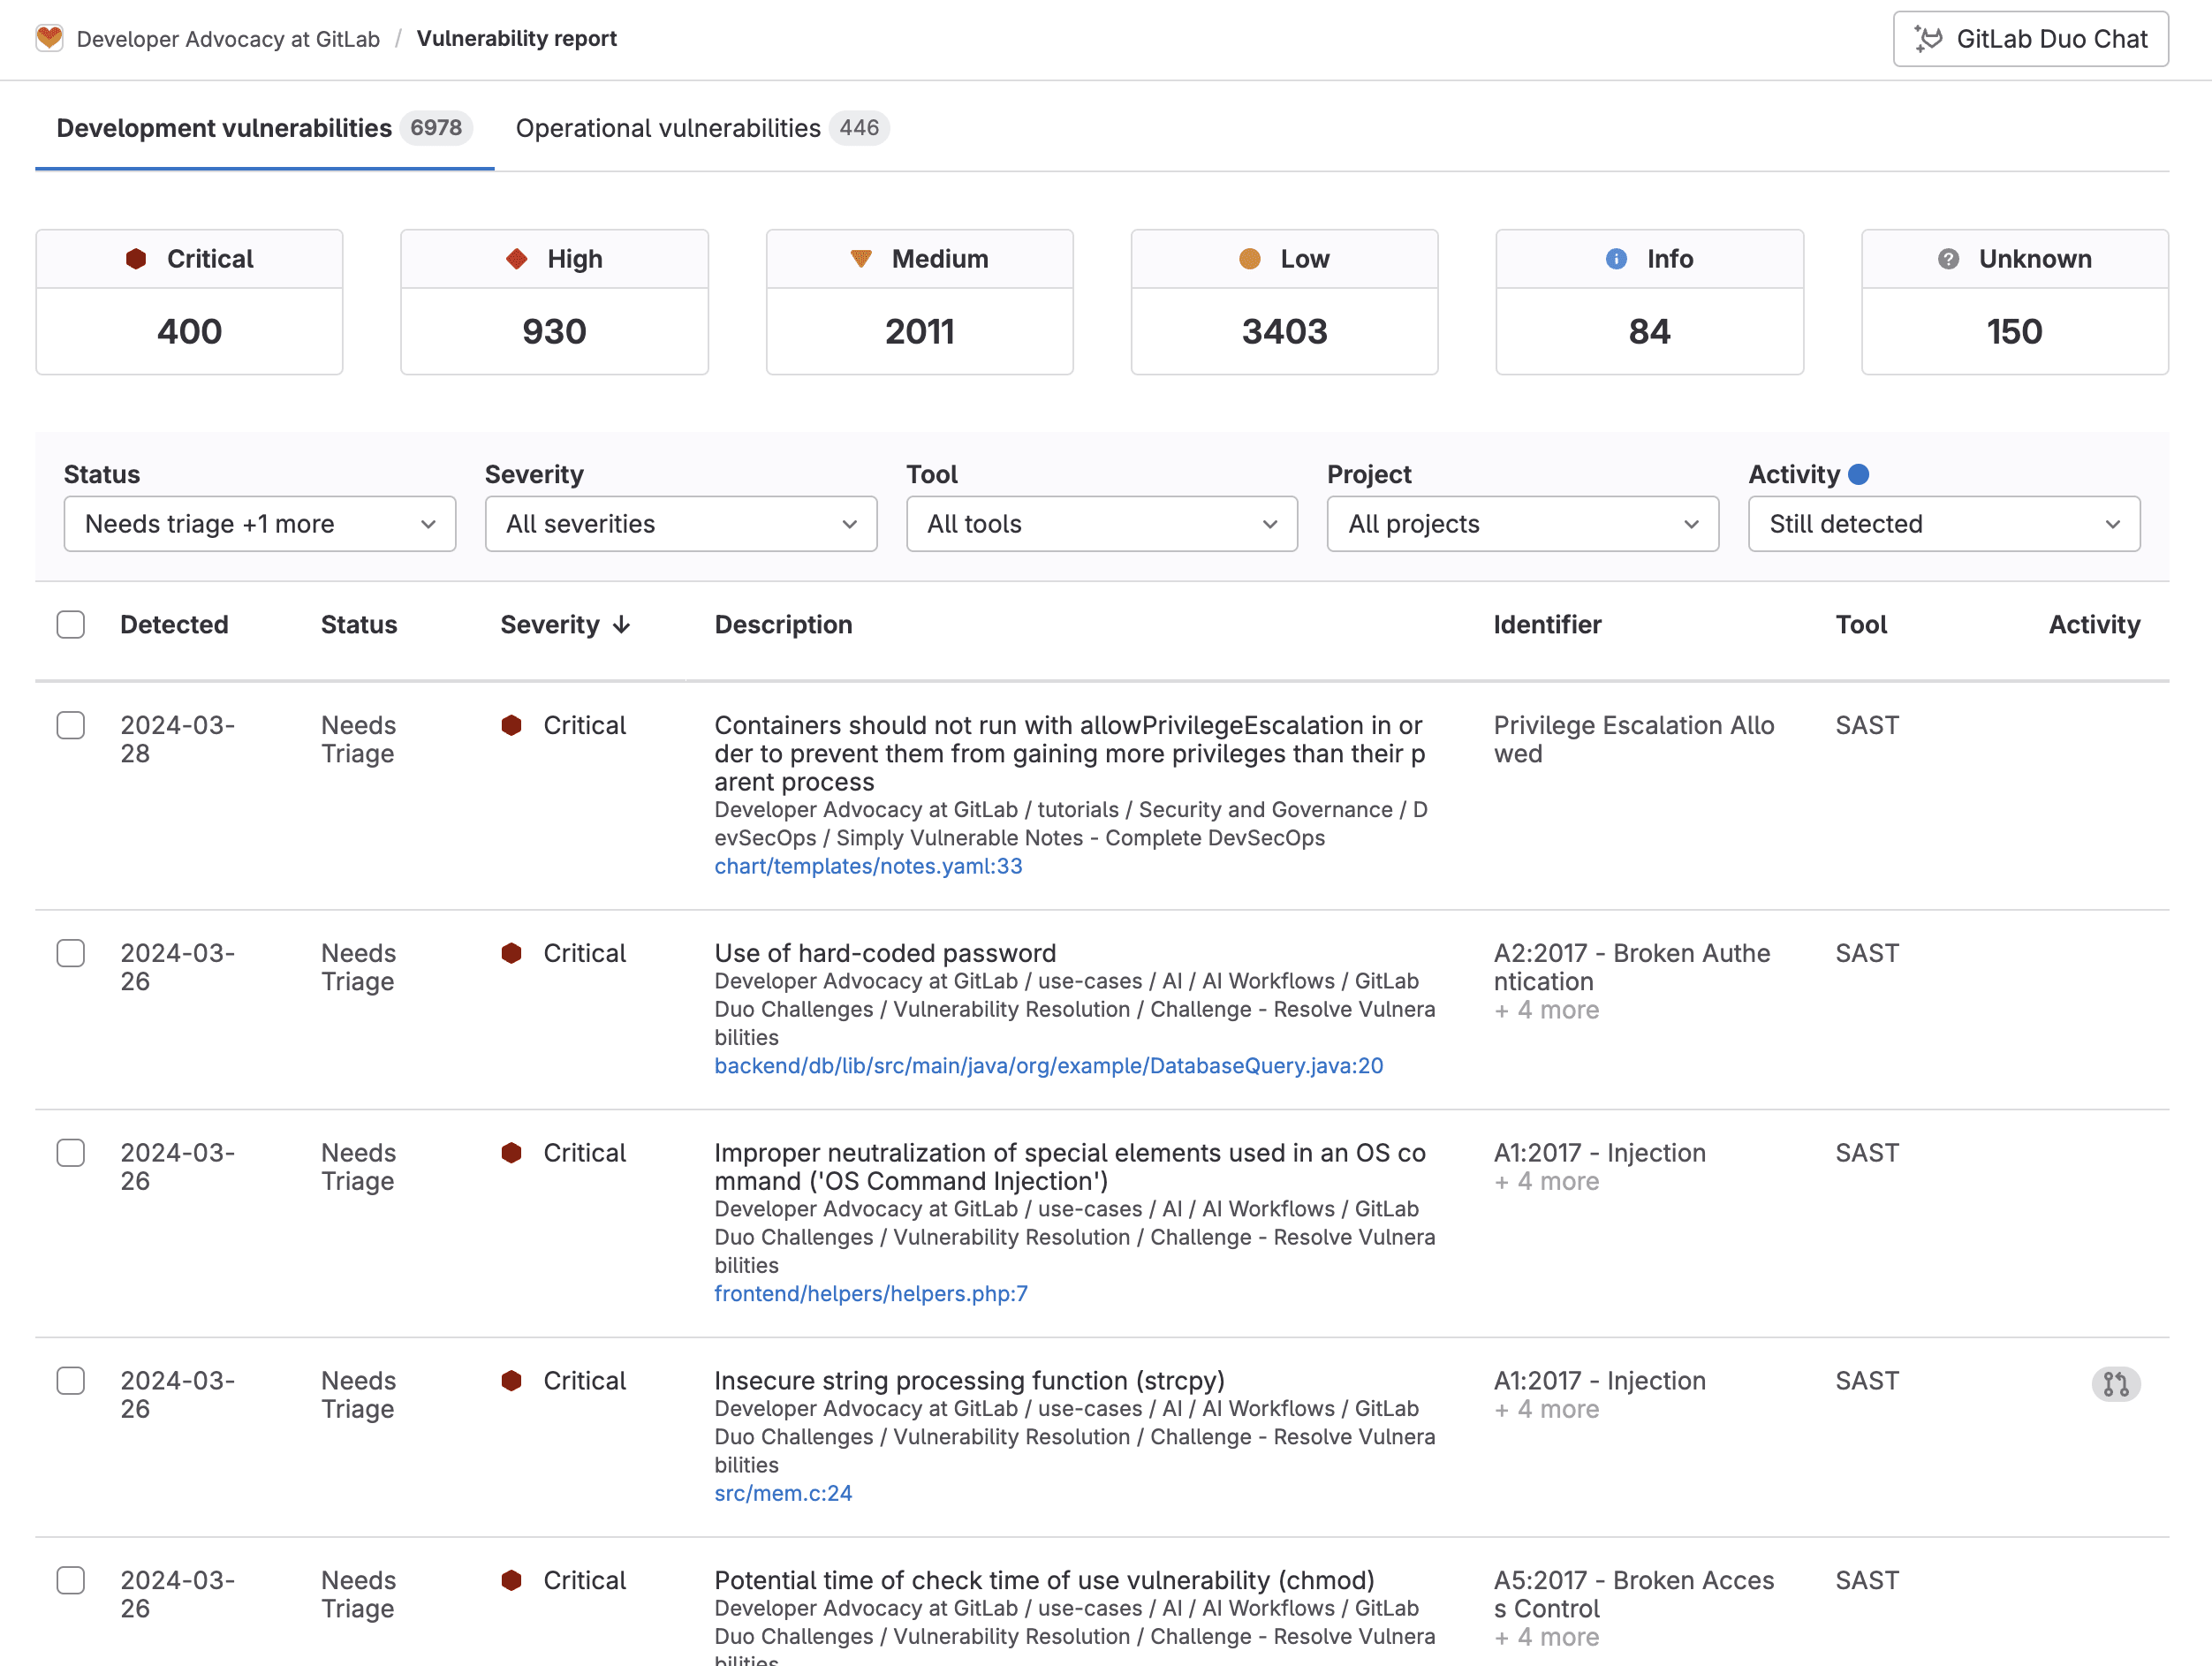
Clicking on a vulnerability enables access to its Vulnerability Page, which contains details of the vulnerability including a description, location, identifiers, and more. Below is an example of the Vulnerability Page for an SQL Injection vulnerability detected by our SAST scanner:
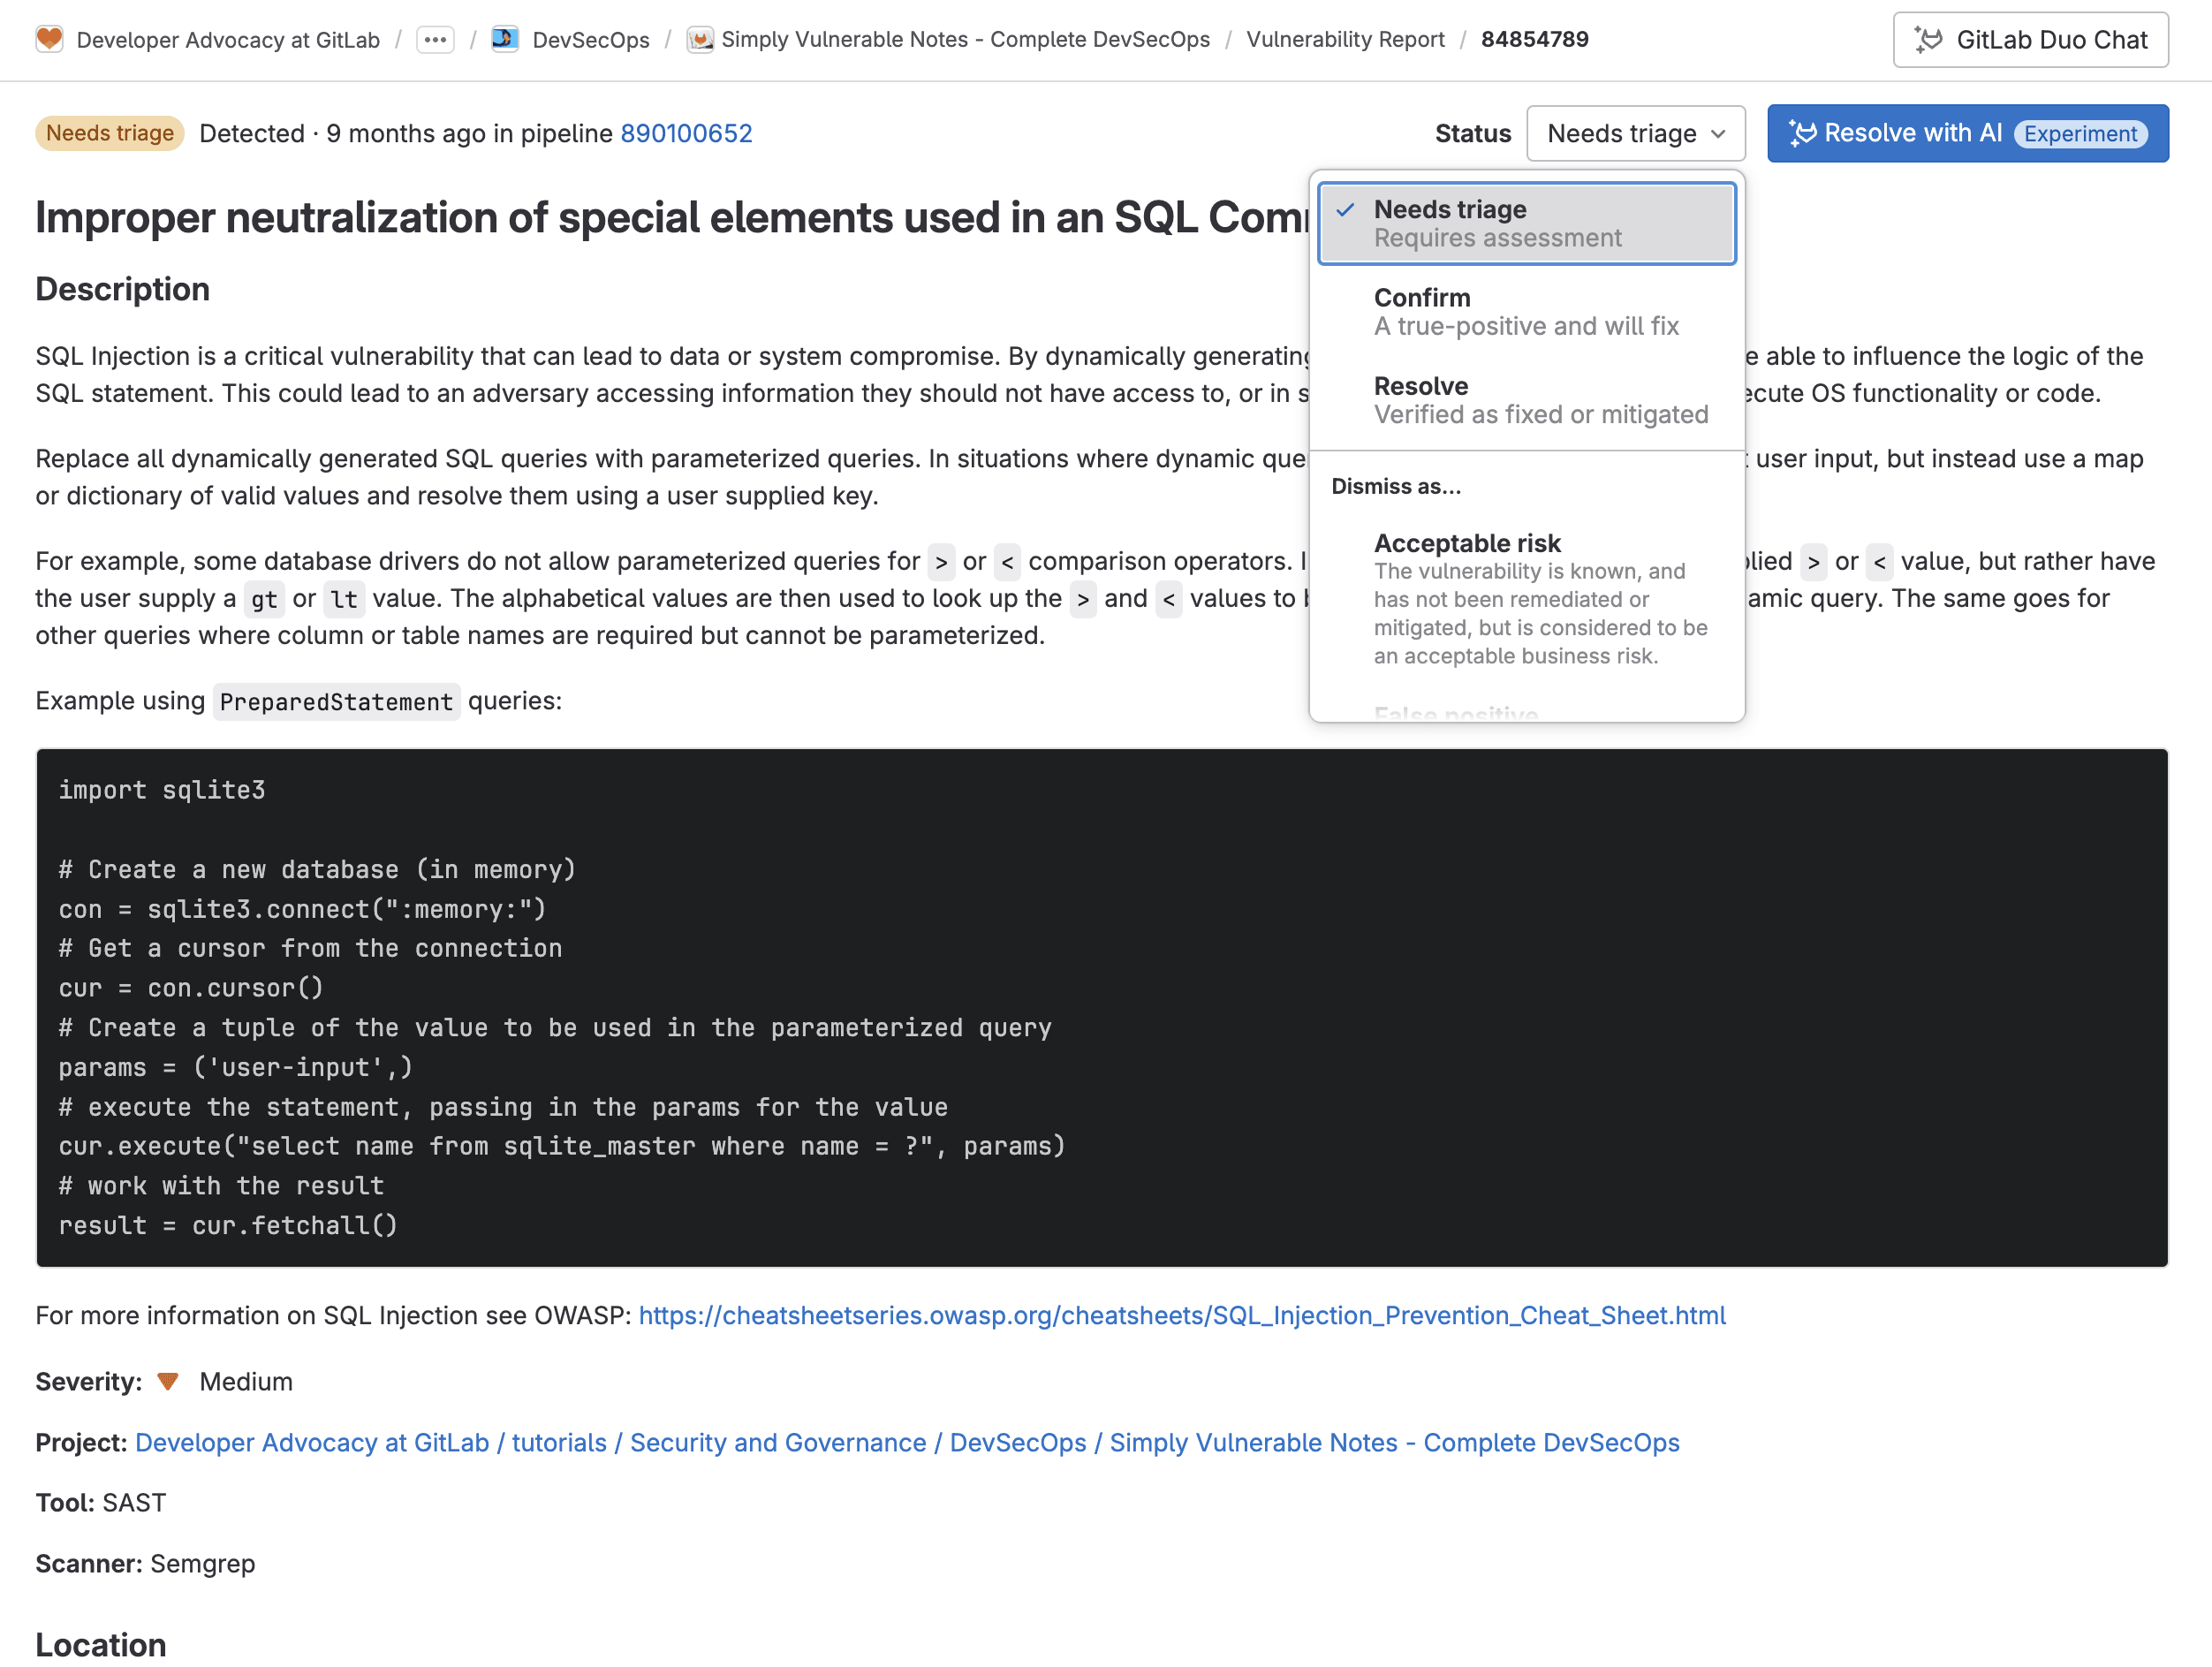
From here the security team can collaborate by changing the status of a vulnerability along with a reason and creating issues to better track changes.
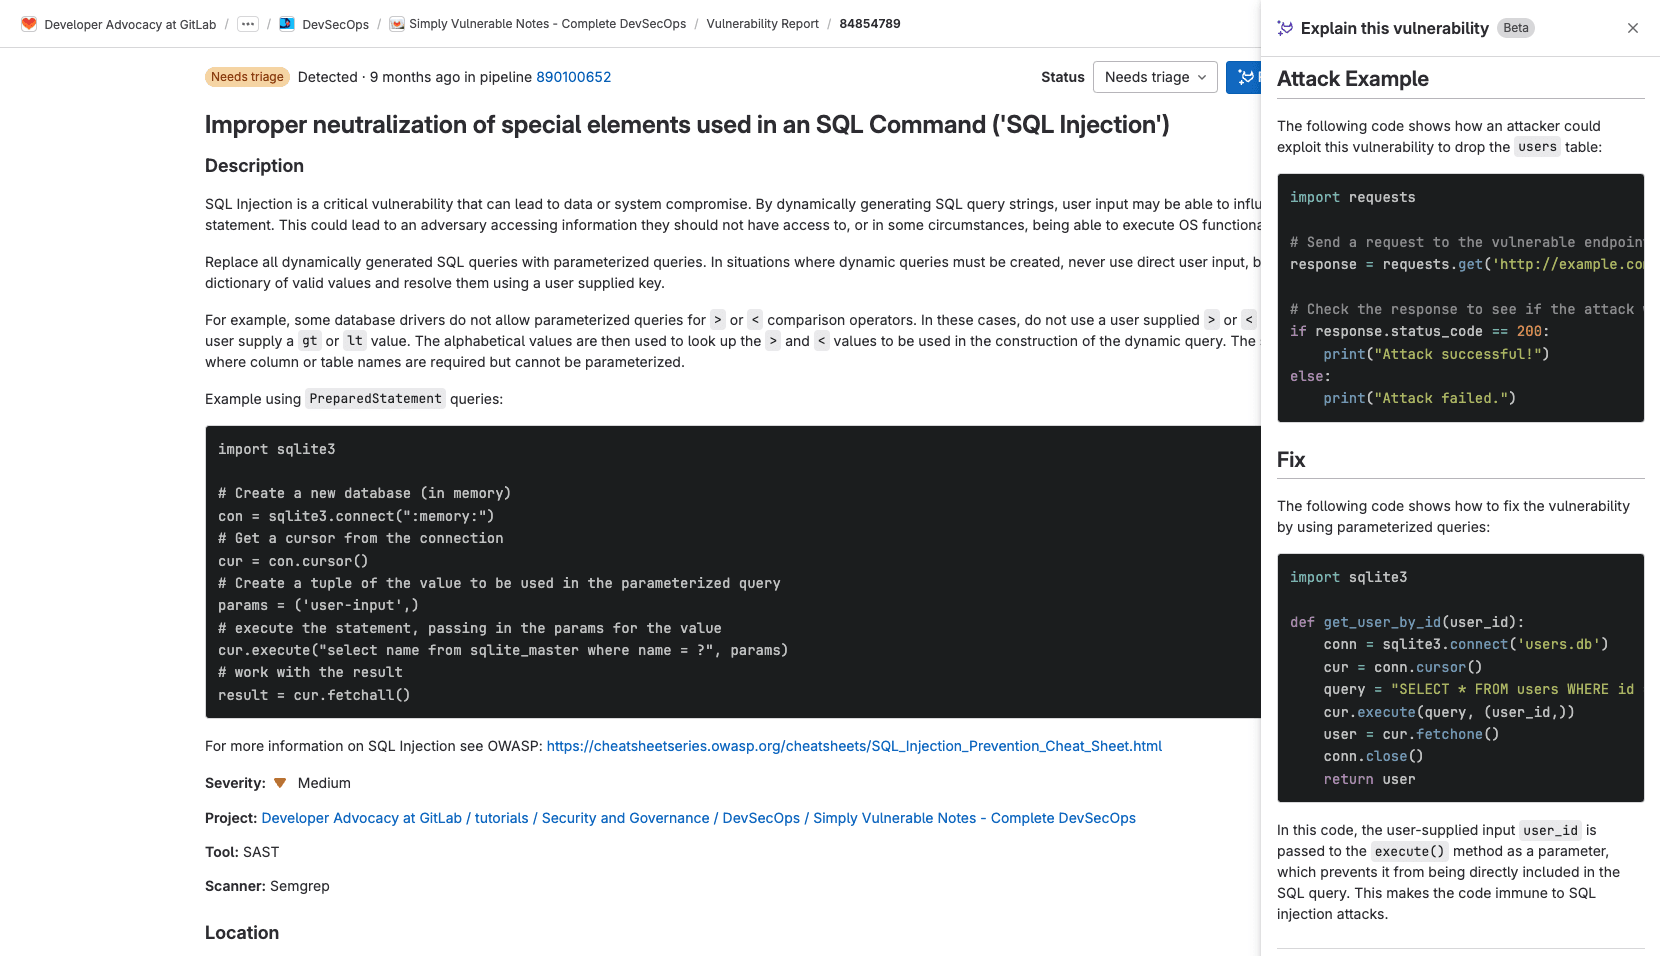
From the Vulnerability Page, you can also leverage GitLab Duo, our AI-powered suite of features, to explain the vulnerability and automatically create a merge request that resolves the vulnerability. GitLab Duo's Vulnerability Explanation uses a large language model to:
- summarize the vulnerability.
- help developers and security analysts to understand the vulnerability, how it could be exploited, and how to fix it
- provide a suggested mitigation
Additional GitLab Ultimate security features
GitLab Ultimate contains many more security features that cannot be found within GitHub Advanced Security. A few examples of these additional security features are: additional security scanners for the complete software development lifecycle (SDLC), granular security guardrails, and custom permissions.
Security scanners for the entire SDLC
Our portfolio of security scanners extends spans the SDLC.
| Scanner Name | Scans | Languages/Files scanned |
|---|---|---|
| Static Application Security Testing (SAST) | Static source code | C/C++, Java, Python, Go, JavaScript, C#, and more |
| Dynamic Application Security Testing (DAST) | Running web application, live API | Language-agnostic |
| Infrastructure as Code (IaC) Scanning | IaC files | Terraform, AWS Cloud Formation, Ansible, and more |
| Container Scanning | Static and running container images | Dockerfile |
| Dependency Scanning and License Scanning | Application dependencies | Requirements.txt, Yarn, Gradle, Npm, and more |
| Web API Fuzz Testing | Sends random/malformed data to web-api | OpenAPI, GraphQL, HAR, Postman Collection |
| Coverage-guided Fuzz Testing | Sends random/malformed data to function | C/C++, Go, Swift, Python, Rust, Java, JavaScript, AFL |
GitLab also allows you to integrate third-party scanners and custom scanners into the platform. Once integrated, the scanner results are automatically presented in various places in GitLab, such as the Pipeline view, merge request widget, and Security dashboard. See the Security Scanner Integration documentation to learn more.
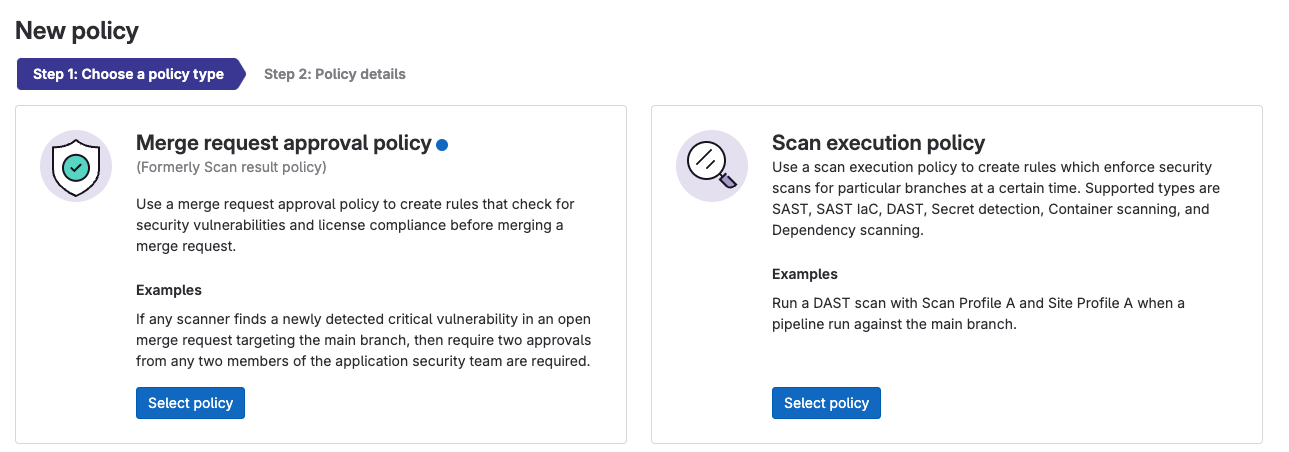
Granular security and compliance policies
Policies in GitLab provide security and compliance teams with a way to enforce controls globally in their organization. Security teams can ensure:
- security scanners are enforced in development team pipelines with proper configuration
- all scan jobs execute without any changes or alterations
- proper approvals are provided on merge requests based on results from those findings
Compliance teams can centrally enforce multiple approvers on all merge requests and ensure various settings are enabled on projects in scope of organizational requirements, such as enabling or locking merge request and repository settings. To learn more see the GitLab Security Policy documentation.
Custom roles and granular permissions
GitLab Ultimate provides custom roles, which allow an organization to create user roles with the precise privileges and permissions required for that organization’s needs.
For example, a user could create a “Security Auditor” role with permissions to view security vulnerabilities in the system, but not be able to view source code, nor perform any changes within the repository. This granular set of permissions enables well-defined separation of duties.
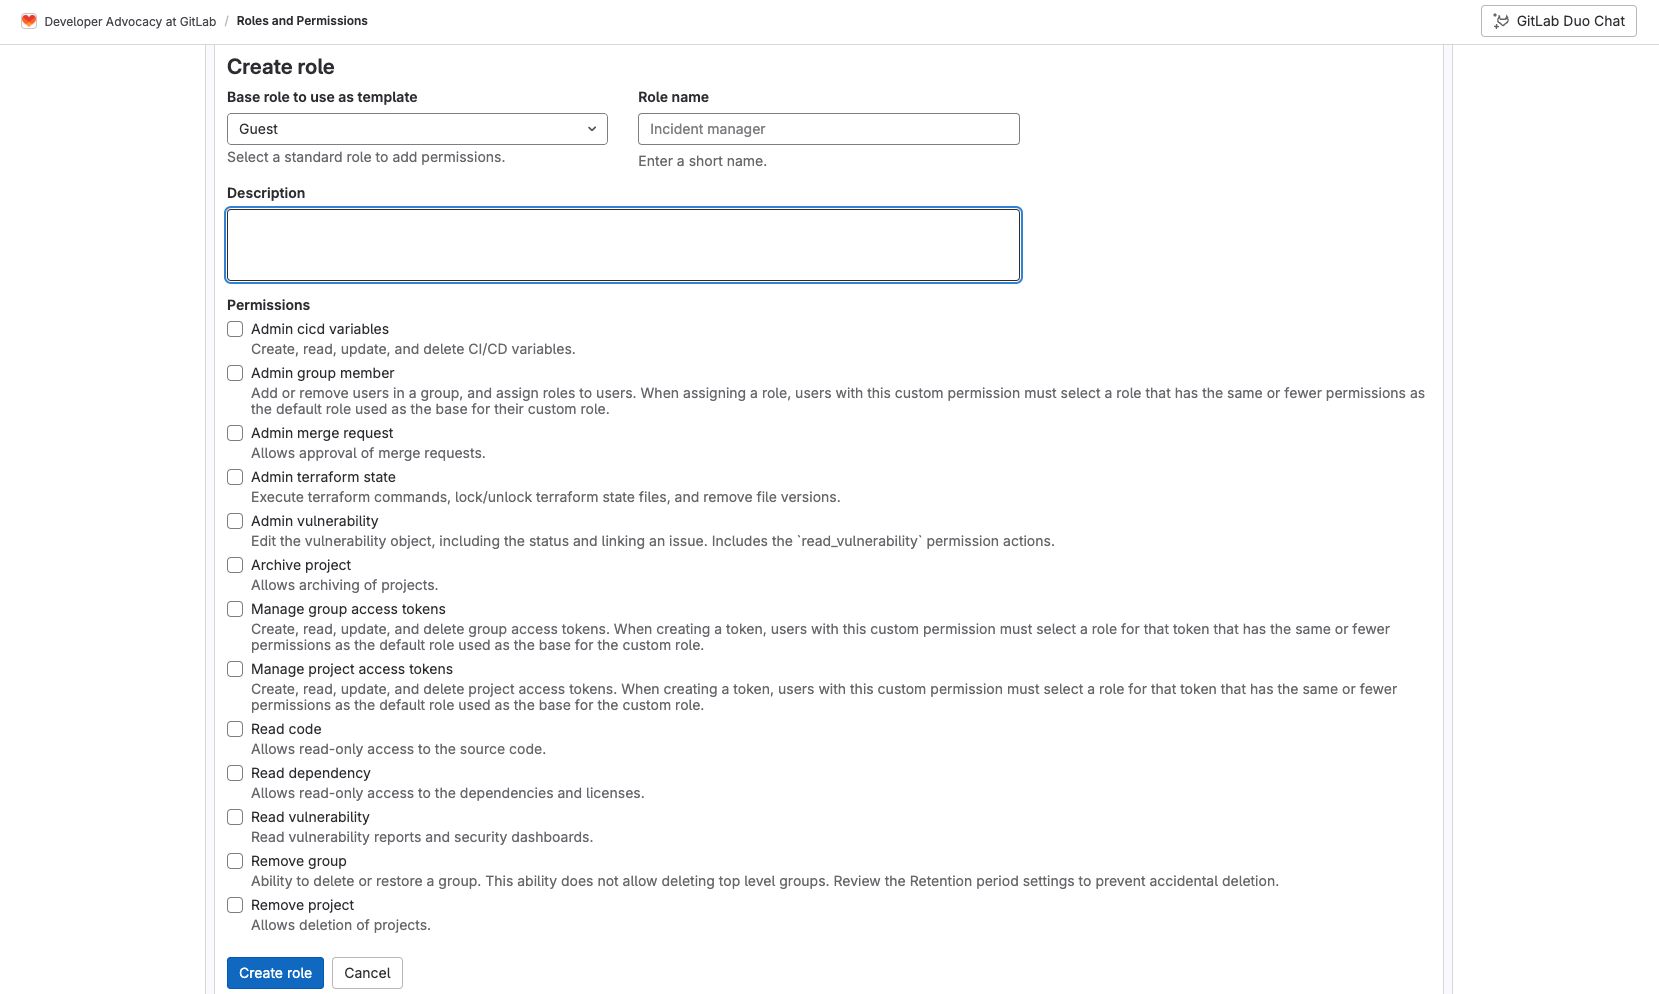
To learn more see the Custom Roles and available Granular Permissions documentation.
Compliance Center
The Compliance Center is the central location for compliance teams to manage their compliance standards’ adherence reporting, violations reporting, and compliance frameworks for their group. The Compliance Center includes the following:
- Compliance standards adherence dashboard lists the adherence status of projects complying to the GitLab standard.
- Compliance violations report shows a high-level view of merge request activity for all projects in the group.
- Compliance frameworks report shows all the compliance frameworks in a group.
- Compliance projects report shows the compliance frameworks that are applied to projects in a group.
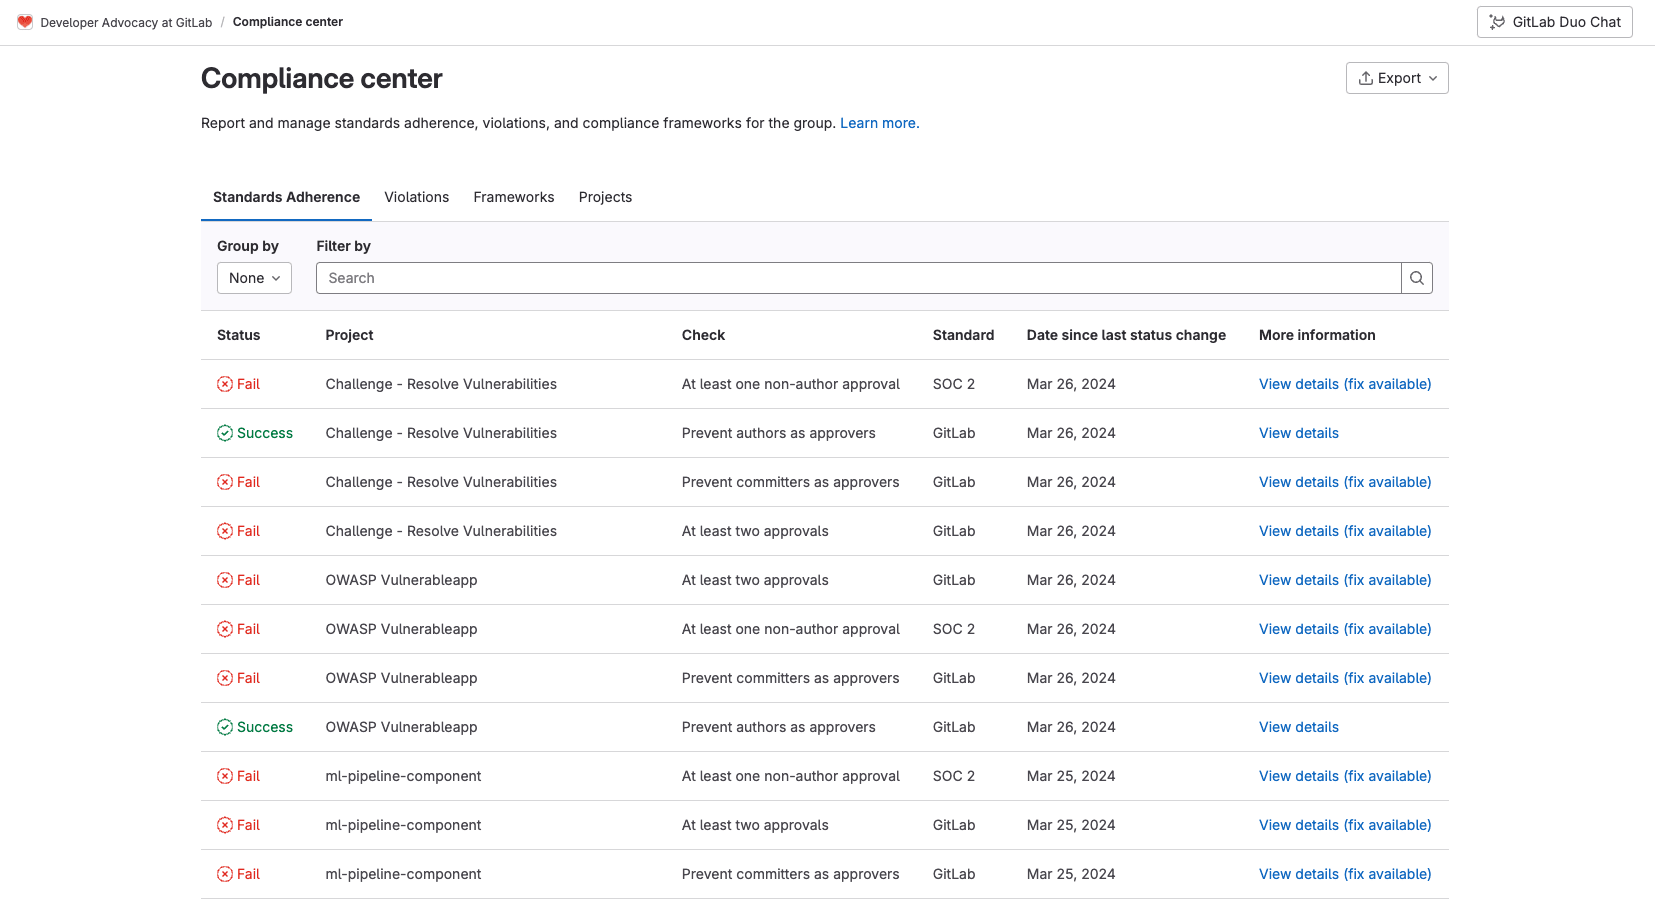
These dashboards assist with making sure separation of duties is being followed to optimize compliance within your organization. To learn more see the Compliance Center documentation.
Read more
This article covers only a portion of the wide range of security features GitLab Ultimate offers. Check out these resources to learn more about how GitLab Ultimate can help enhance your organizational security and developer efficiency:
- Why GitLab Ultimate
- Getting Started with DevSecOps Tutorial
- Getting Started with DevSecOps Sample Project
- Import your project from GitHub to GitLab documentation
- Migrating from GitHub Actions documentation
- Tutorial: Create and run your first GitLab CI/CD pipeline
- Tutorial: Create a complex pipeline
- CI/CD YAML syntax reference