Published on: December 21, 2023
7 min read
Introducing the GitLab CI/CD Catalog Beta
Discover, reuse, and contribute CI/CD components effortlessly, enhancing collaboration and efficiency when creating pipeline configurations.


DevSecOps is all about speed – achieving rapid progress in software development. To succeed in DevSecOps, organizations require a well-functioning CI/CD pipeline that teams can utilize to automate their development workflows.
However, crafting pipeline configurations with YAML can be intricate and challenging because YAML isn't a programming language, Developers may find themselves reinventing the wheel each time they try to create new configurations because they don't have visibility into existing configurations and work that others may have already done, resulting in inefficiency.
GitLab 16.7 introduces the CI/CD Catalog (Beta), with the goal of enhancing developer efficiency by addressing three main questions developers encounter when creating pipeline configurations:
- Discoverability: Has someone already created a configuration for my task, and where can I find it?
- Reusability: Once I find a suitable pipeline, how do I use it effectively?
- Ease of contribution: I've created a useful configuration; how can I easily share it with the GitLab community?
What is the GitLab CI/CD Catalog?
The CI/CD Catalog serves as a centralized hub for developers and organizations to share pre-existing CI/CD components and to discover reusable configurations that others may have already developed. Every component published by users will be part of a public catalog accessible to all users, regardless of their organization or project.
This approach promotes cross-organization collaboration, allowing the entire GitLab community to benefit from the wealth of CI components available. It's a powerful step forward in sharing knowledge among GitLab users, enabling developers to harness the collective expertise of the platform.
Easy component creation and publishing
In addition to reusing components, developers can contribute to the GitLab CI/CD community by creating their own components and publishing them in the catalog. This ensures that others can benefit from their expertise and encourages collaboration across the platform.
How to discover and use components
1. Opening the CI/CD Component Catalog
Click on “Search or go to...”
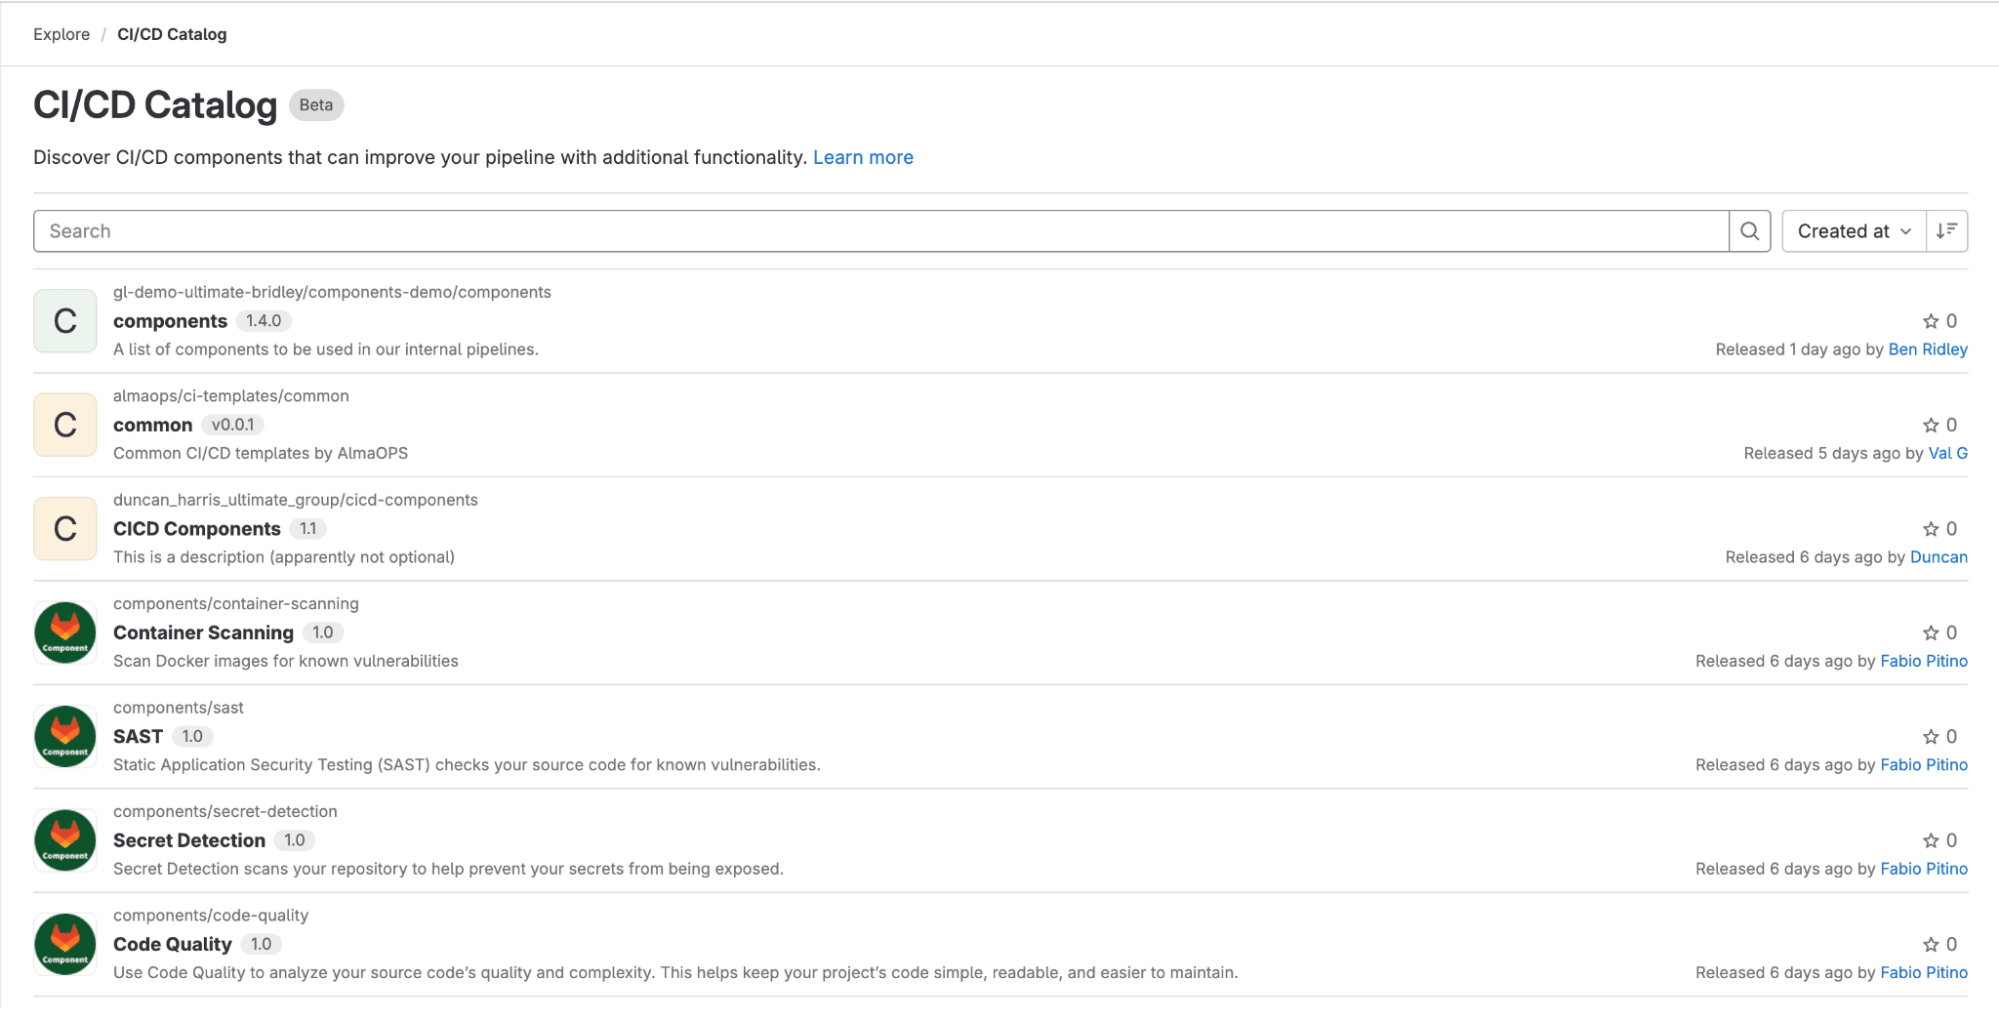
Open the catalog by navigating to “Explore > CI/CD Catalog” or visit this catalog page.
Upon accessing the catalog, you'll find a list of CI/CD components projects contributed by your team, organization, or the wider GitLab community.
2. Browsing components
Navigate through the list of components in the CI/CD Catalog or use the Search bar to find components related to a specific topic.
Each component project contains one or multiple components. Opening a component project will display its documentation, providing details on all available components. This includes insights into how to use each component and understanding the expected input parameters.
3. Include the selected components in your .gitlab-ci.yml
Now that you've explored the catalog and selected the desired CI/CD components, integrate them into your project's CI/CD pipeline.
Follow these steps to update your .gitlab-ci.yml file:
- Open the .gitlab-ci.yml file in your project for editing.
- Use the include keyword to add the selected components to your CI configuration.
- Ensure that the paths to the component YAML files are correct and specify the appropriate version for each component.
- In case the components have input parameters, review the component’s documentation to understand which inputs are required, and add them to your CI configuration.
- Save and commit your changes to the .gitlab-ci.yml file.
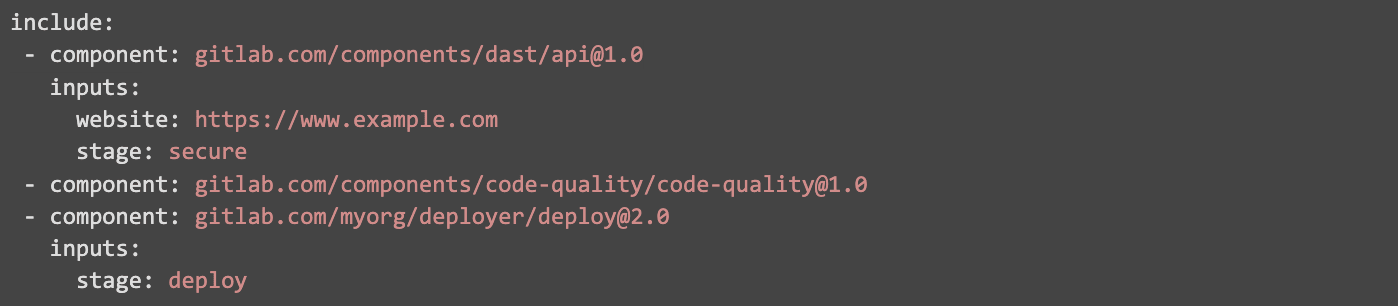
Here is an example of YAML code that demonstrates how to include a few components and use them with input parameters.
How to create and publish components
Have you crafted a valuable configuration that you'd like to share and contribute to your team or the GitLab community? Here are the six steps to make it happen:
Step 1: Create a new project and set it as a component project
- On the left sidebar, select Search or go to and find your project.
- On the left sidebar, select Settings > General.
- Expand Visibility, project features, permissions.
- Scroll down to CI/CD Catalog resource and select the toggle to set the project as a CI/CD Catalog resource.
- Ensure that your project description is filled out; this information will be showcased in the catalog, providing users with insights into the purpose and functionality of your components.
- Create a .gitlab-ci.yml file in the root of the repository. You will need this file to test and release the components as described in steps 4 and 5 below. Note: This step only needs to be done once for any project that contains components.
Step 2: Create the components
- Create a /templates folder in the root directory of the project.
- In this templates directory, create one YAML template file (ending in .yml) for each component.
- The template can optionally include a description of input arguments using the
speckeyword if the component requires input parameters, and the definition of jobs, that may include references to values using the interpolation format $[[ inputs.input-name ]]. Ensure you use three dash lines between the spec header, and job definitions.
Here is an example of a deploy.yml template that gets input parameters:
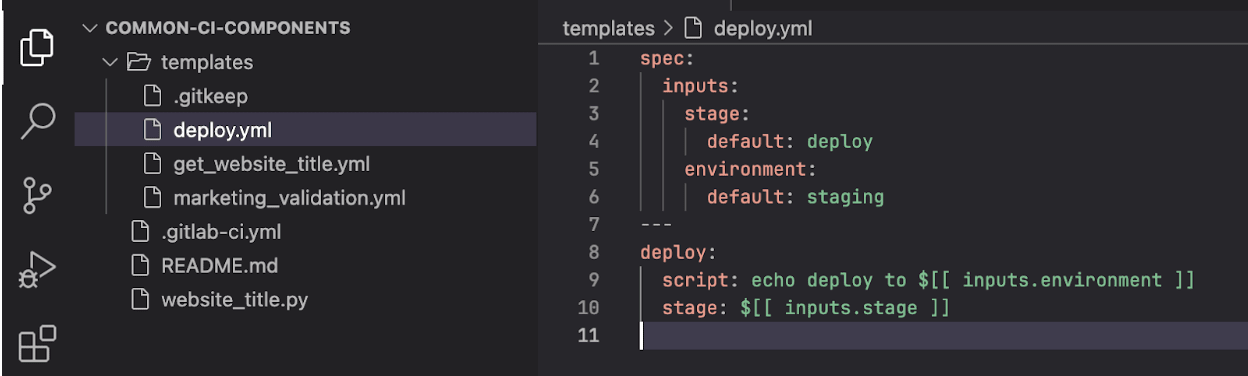
In this template, we've defined two input parameters, stage and environment, both with default values. In the content section, a job is defined that interpolates these input arguments.
Step 3: Create components documentation
Create a README.md file in the root of the project, including information about the components. Explain the component's functionality, detail input parameters, and provide illustrative examples. This ensures clarity for component consumers on how to use them.
This is an example of component documentation:
Additional information can be found in our CI/CD components documentation.
Step 4: Add tests to the components (recommended)
Developing a component follows a standard software development cycle with stages like build, test, and deploy. It's highly recommended to test your components before publishing them. Check out this example test, which queries the GitLab REST API to check whether a component job has been added to the pipeline. Feel free to use it, and consider adding more tests to ensure your components work as expected.
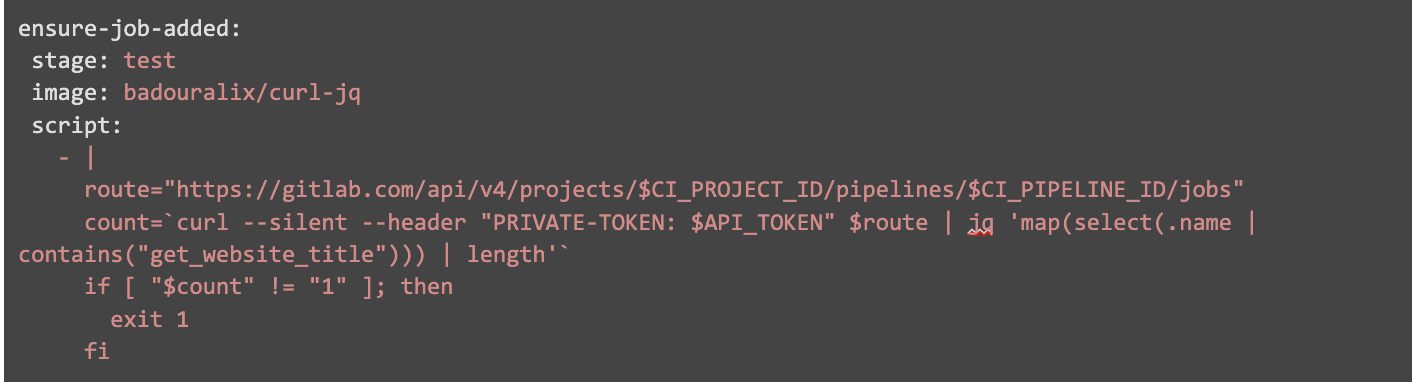
Include all your test jobs in the .gitlab-ci.yml file in your Catalog project.
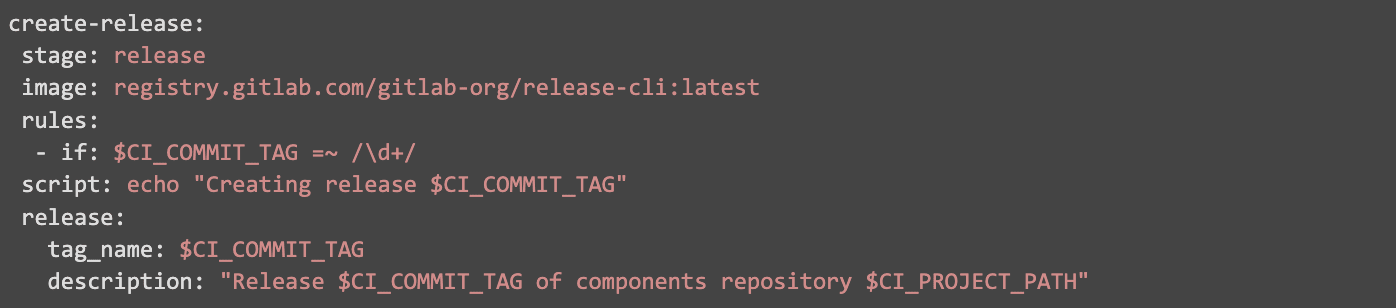
Step 5: Prepare your CI/CD configuration for publishing
- Create a release job in the .gitlab-ci.yml file in the component project using the
Releasekeyword. See the job example:

Note: Do not "create release" from GitLab UI since this soon won't be supported for a Component Catalog.
- We recommend adding this rule in the Release job; this will automatically trigger the Release job only when creating a git tag starts with digits in the project, following semantic release conventions (1.0.0 for example).

- So this is how we recommend your job to look:
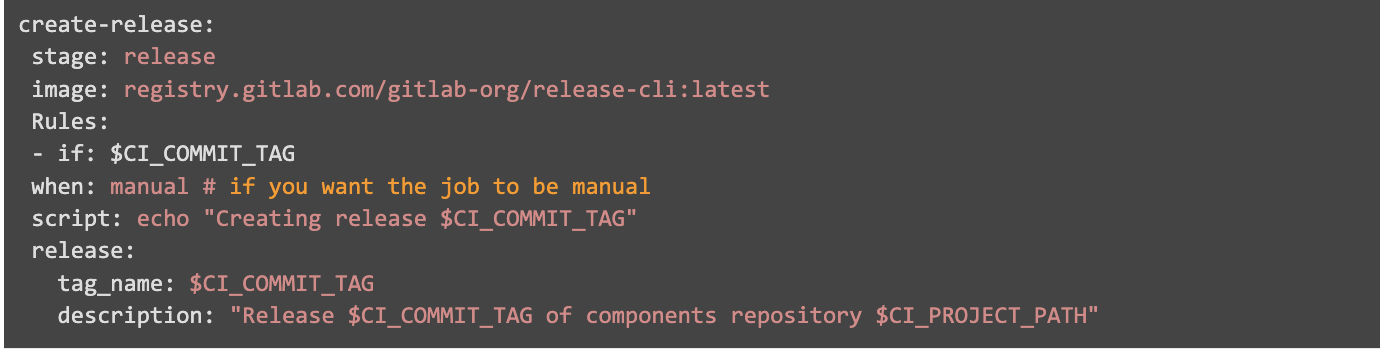
- To manually release components, add manual rule as below, so when the pipeline is triggered, someone will need to manually run the release job.

Here is the release job with the when:manual rule:
Step 6: Publish your components
Once you are satisfied with your components, and all tests have passed successfully, it's time to publish a new version by creating a git tag, so they will be available in the CI/CD Catalog.
-
Create a Git tag using the semantic versioning format "MAJOR.MINOR.PATCH".
-
You can create tags through the UI by navigating to Code -> Tags -> New Tag, or via the CLI using
git tag. -
Creating the tag will trigger a pipeline that runs the Release job if all tests pass successfully. The component project will then be assigned the version you defined in the tag, and it will appear in the catalog.
Example projects
Documentation
For more details on using components from the CI/CD Catalog and maximizing their potential within your projects, refer to the official CI/CD Catalog documentation. This documentation provides in-depth insights into the functionality.
Take a tour of the GitLab CI/CD Catalog.
A special thank you to Dov Hershkovitch and Fabio Pitino for their invaluable content reviews and contributions to this blog post.