Published on: February 27, 2024
8 min read
How to integrate custom security scanners into GitLab
Learn how to extend the DevSecOps platform by adding custom security scanners to your workflows (includes an easy-to-follow tutorial).

GitLab, the most comprehensive DevSecOps platform, has everything you need to plan, manage, build, deploy, secure, govern, and monitor your applications. However, there are instances where you may want to extend GitLab with third-party or custom tools. For example, you might need to migrate to a DevSecOps platform from separate solutions, evaluate third-party tools, or integrate proprietary or custom-built solutions into GitLab.
Here's what is covered:
- GitLab DevSecOps platform extensibility
- GitLab security scanner integration
- Tutorial: Integrating custom security scanners
GitLab DevSecOps platform extensibility
GitLab can be extended in many ways to support enhanced functionality that your organization may require. Some common examples of these integrations include:
- external application integrations such as Jenkins and Slack
- external issue tracking integrations such as Bugzilla and Jira
- external authentication provider integrations such as LDAP and SAML
- external security scanner integrations such as Fortify and Checkmarx
- ability to respond to leaked secrets such as AWS and GCP access keys
You can see all the available integrations in the Integrate with GitLab documentation. (Note: Not all integrations are listed in the documentation.)
GitLab security scanner integration
Third-party security scanners or custom-built security scanners can be integrated into GitLab to populate the merge request widget, Pipeline Security section, Vulnerability Report, vulnerability pages, Security dashboard, and Scan Result Policies. Let's review each integration.
Merge request security widget
A merge request contains a security widget which displays a summary of the newly detected vulnerabilities.
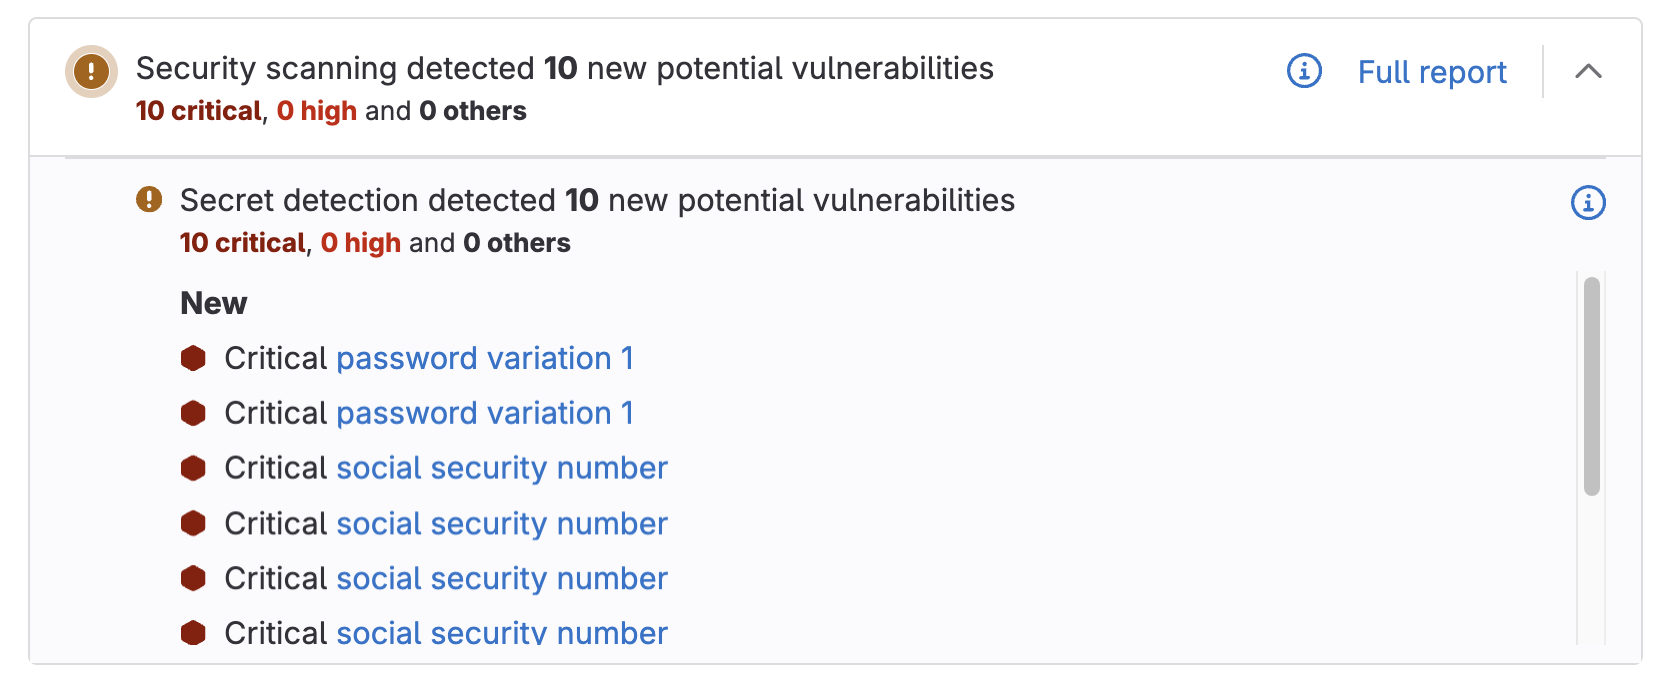
When you click on a vulnerability, you will see a popup that contains the following information:
- status
- description
- project
- file
- identifiers
- severity
- tool
- scanner provider

These vulnerabilities are also actionable, which means that they can either be dismissed or a confidential issue can be created.
The results of a custom scanner can be used to populate the security widget. The vulnerability data is populated from the JSON schema the scanner emits.
Pipeline Security section
All enabled security analyzers run in the pipeline and output their results as artifacts. These artifacts are processed, including deduplication, and the results are listed on the Pipeline Security tab. From here, you can also download the resulting JSON files.

The results of a custom scanner can be used to populate the Pipeline Security tab. The columns are filled in using the JSON schema the scanner emits.
Vulnerability Report
The Vulnerability Report provides information about vulnerabilities from scans of the default branch, including:
- totals of vulnerabilities per severity level
- filters for common vulnerability attributes
- details of each vulnerability, presented in tabular layout
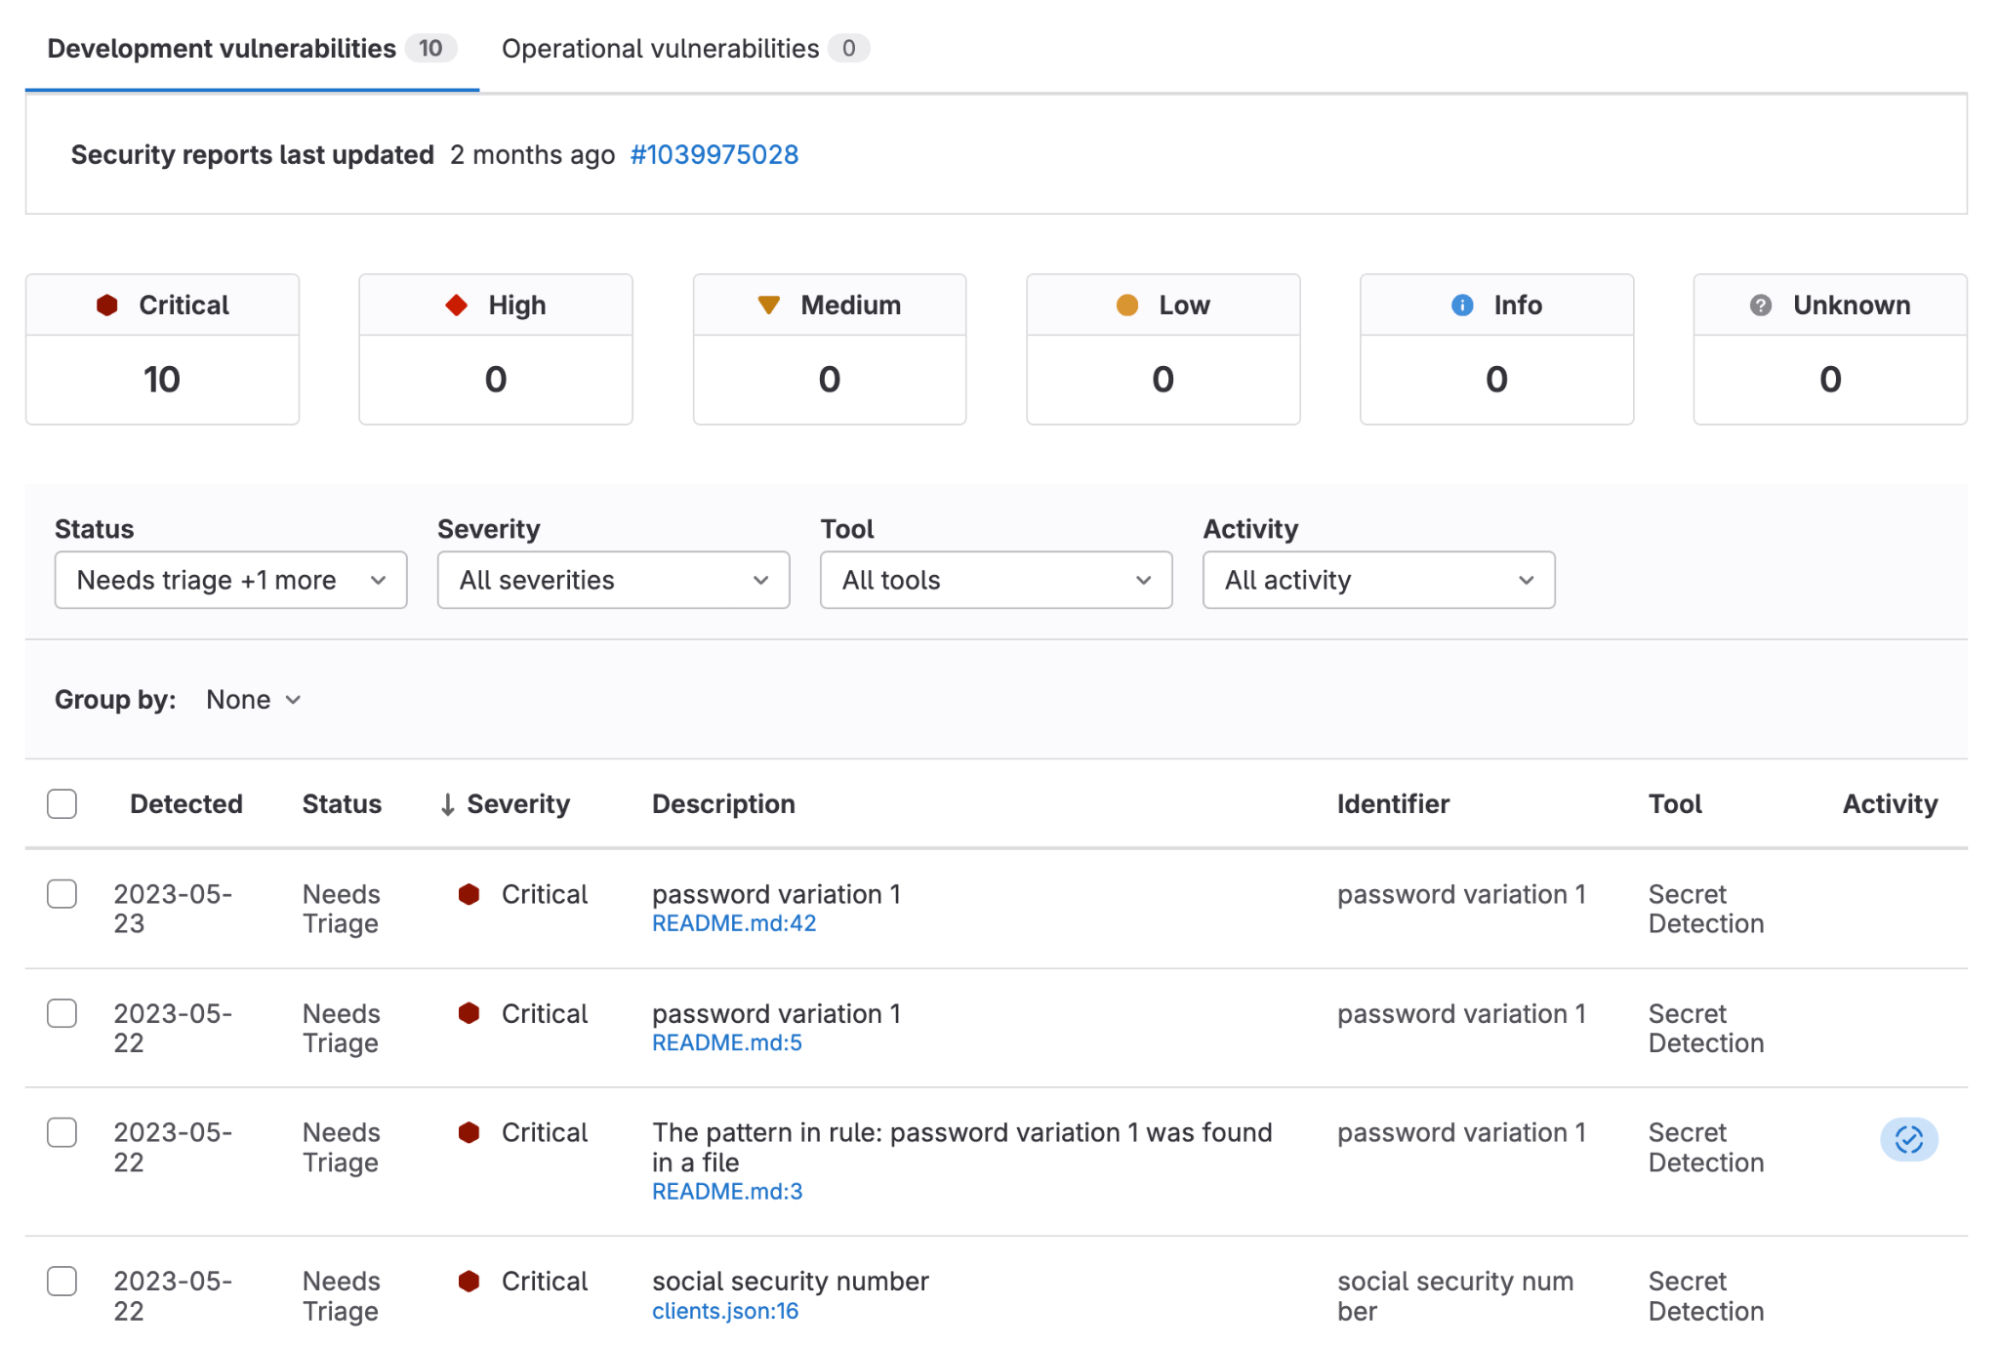
The results of a custom scanner on the default branch can be used to populate the Vulnerability Report.
Vulnerability pages
Clicking on a vulnerability present within the Vulnerability Report takes you to its vulnerability page. Each vulnerability in a project has a vulnerability page that provides details such as:
- description
- when it was detected
- current status
- location detected
- available actions
- linked issues
- actions log
- solutions
- identifier
- training
You can use the data provided in the vulnerability page to triage a detected vulnerability as well as assist in its remediation.
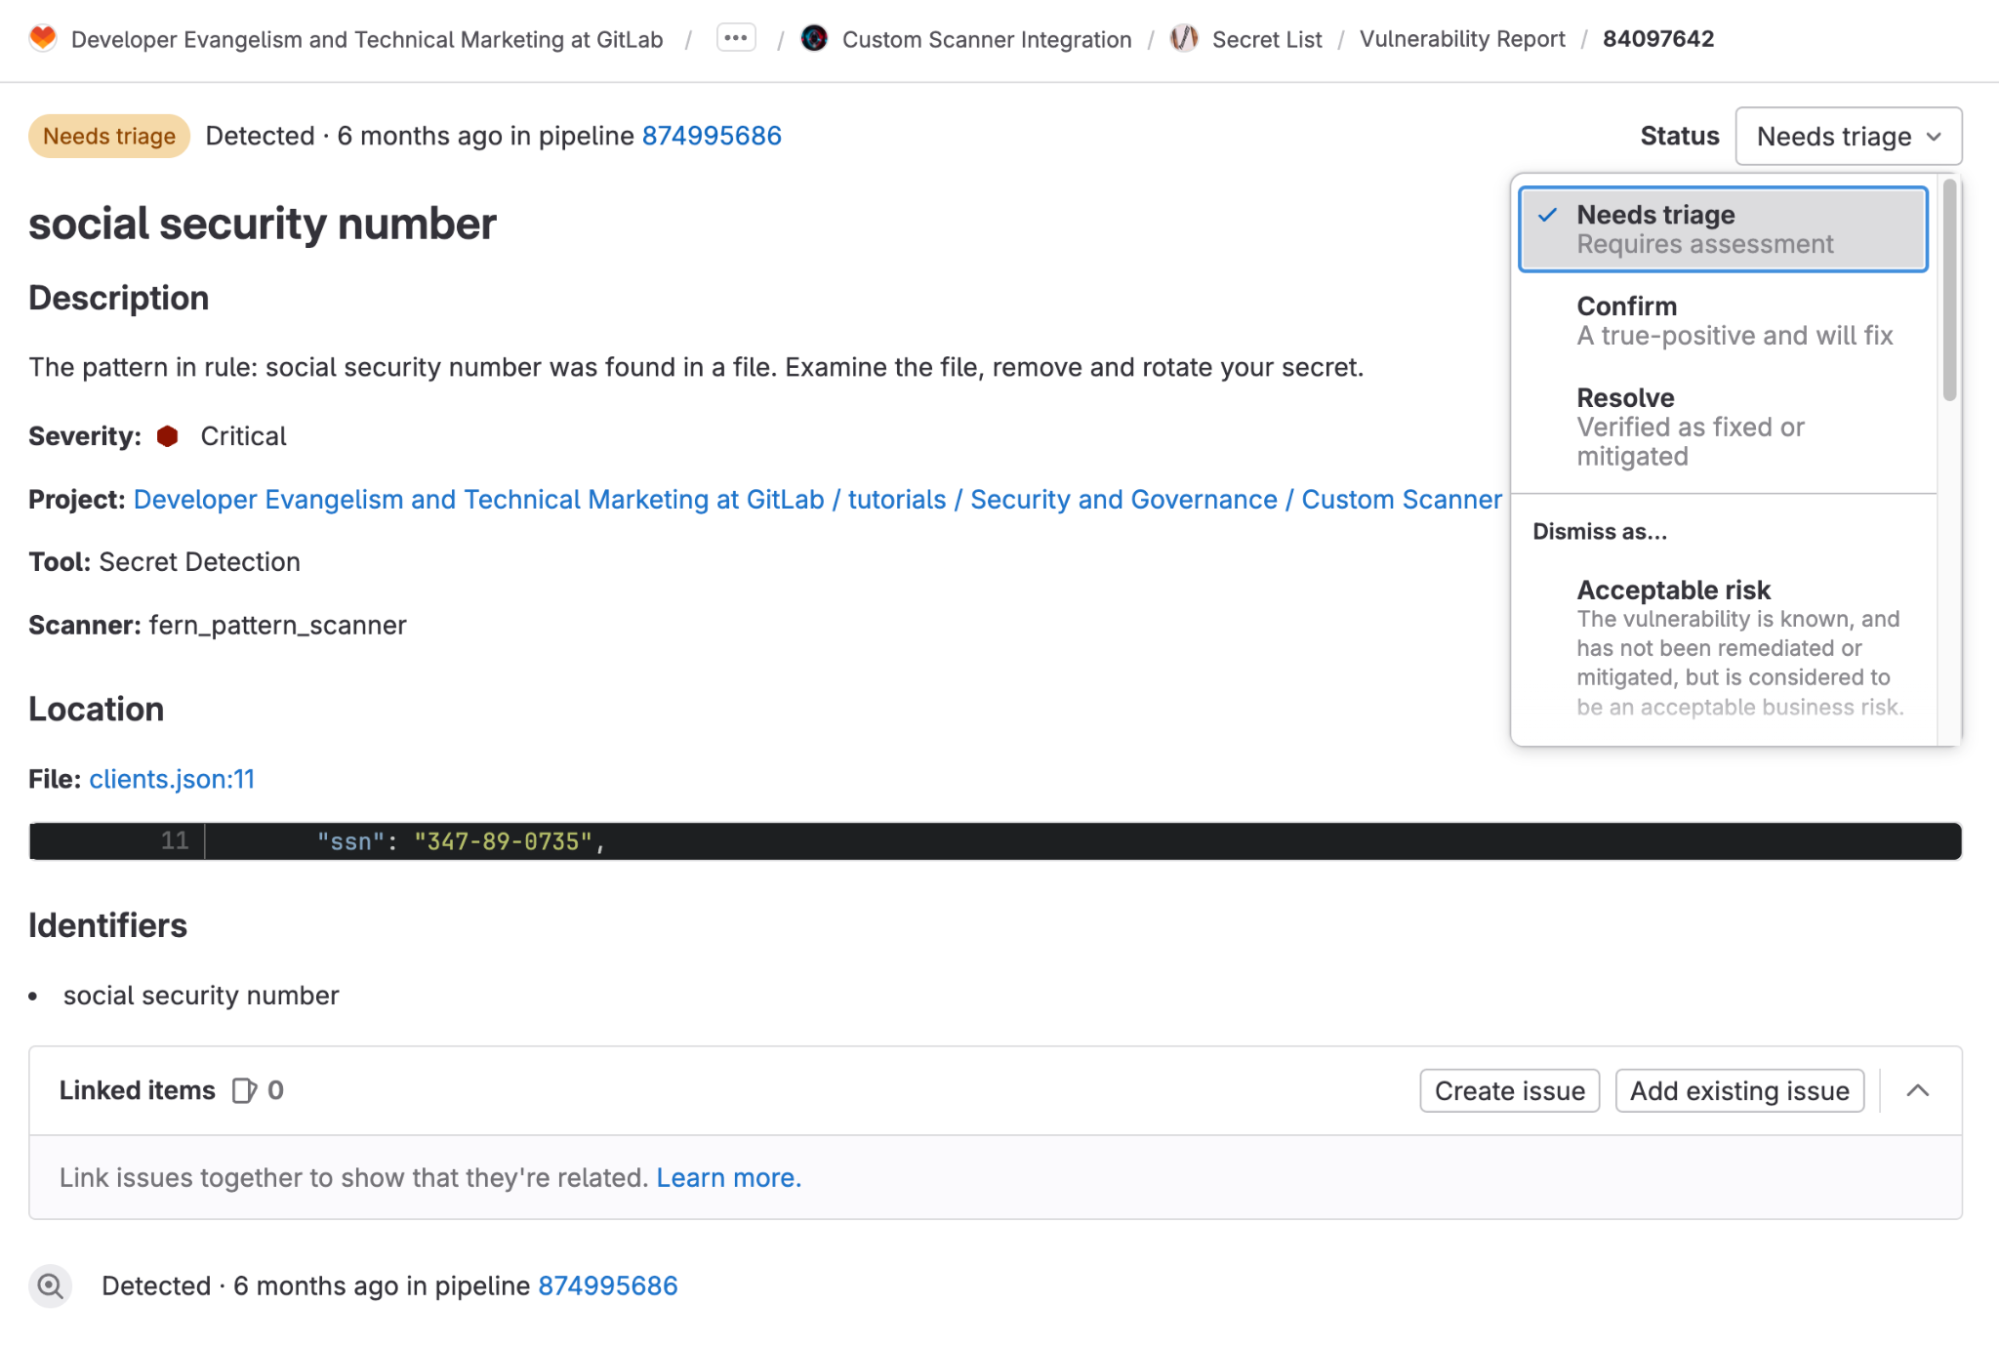
The results of a custom scanner can be used to populate the vulnerability page. The vulnerability data is populated from the JSON schema the scanner emits.
Security dashboard
Security dashboards are used to assess the security posture of your applications. GitLab provides you with a collection of metrics, ratings, and charts for the vulnerabilities detected by the security scanners run on your project. The security dashboard provides data such as:
- vulnerability trends over a 30-, 60-, or 90-day timeframe for all projects in a group
- a letter grade rating for each project based on vulnerability severity
- the total number of vulnerabilities detected within the last 365 days and their severity levels
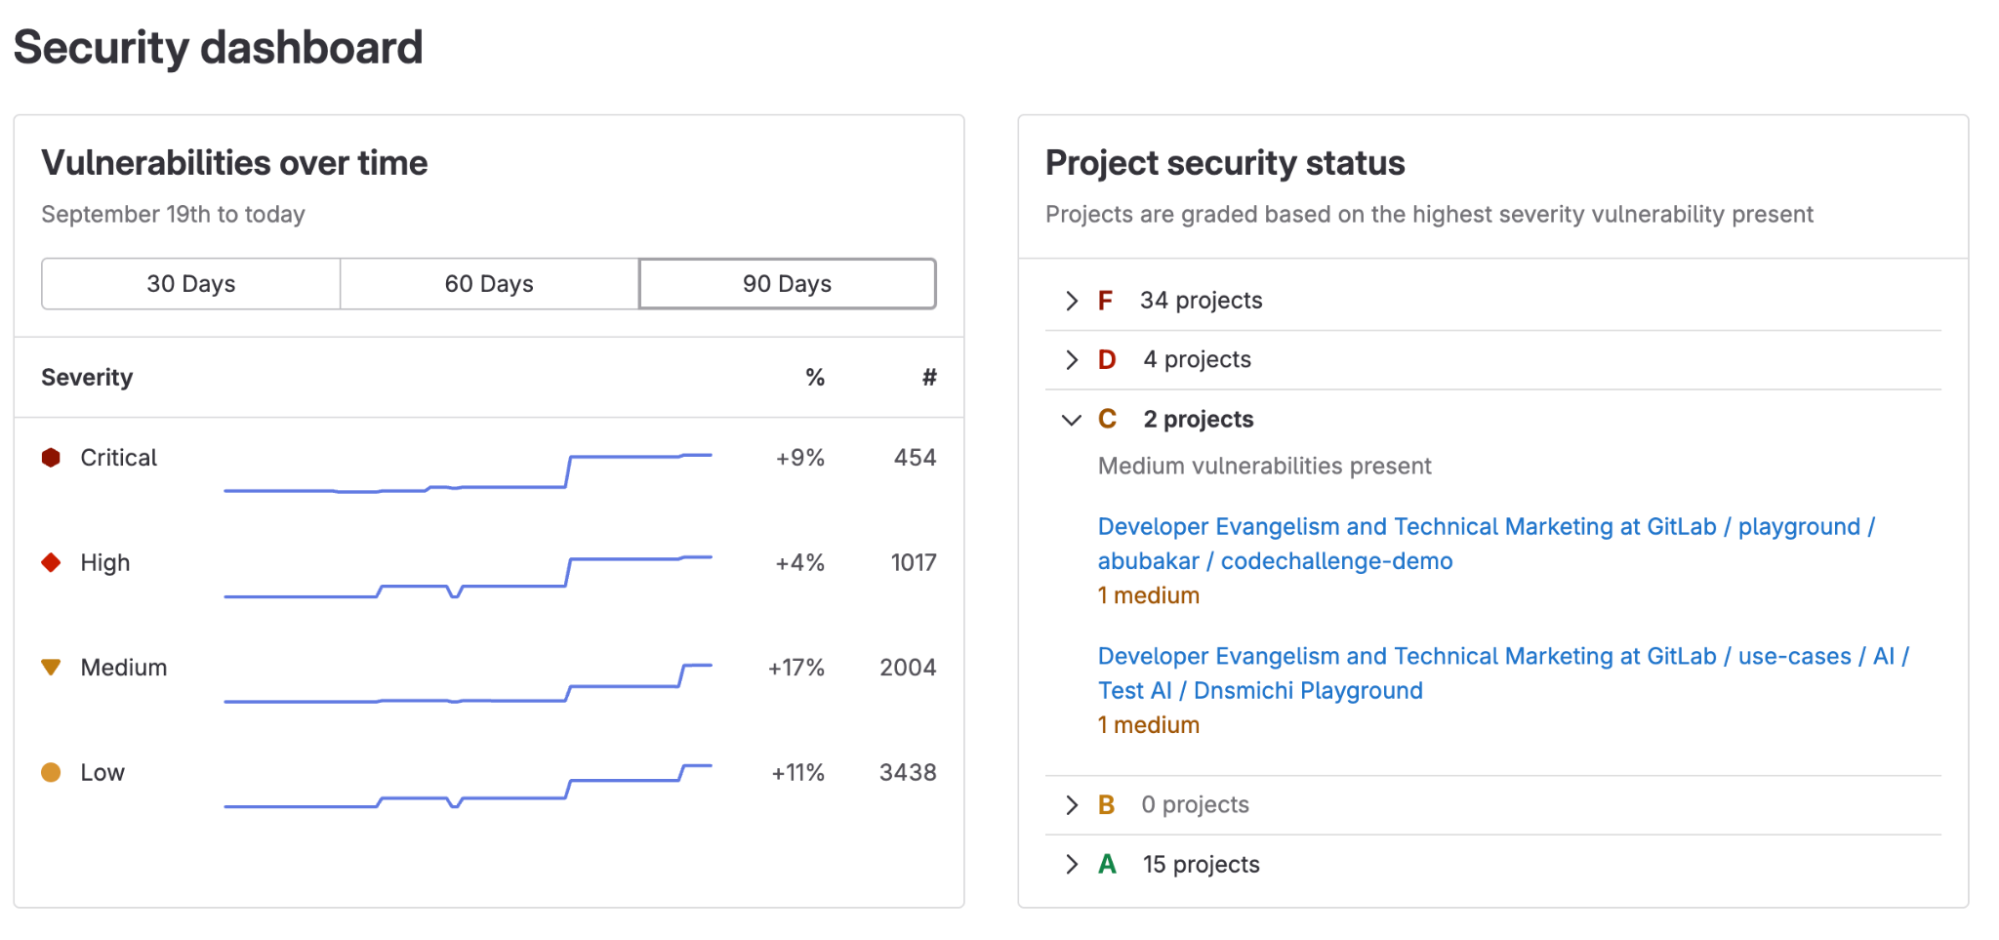
From the group-level Security dashboard you can click on a project to access its specific Security dashboard, which provides the 365-day view.

Scan Result Policy integration
Scan Result Policies are used to require approval based on the findings of one or more security scan jobs. This can prevent insecure code from being merged to production. Scan Result Policies are evaluated after a CI scanning job is fully executed, where policies are evaluated based on the job artifact reports that are published in the completed pipeline.
For example, you can create a Scan Result Policy that requires approval from project maintainers if a secret detection scanner finds any vulnerabilities. Here's how:
- On the left sidebar, select Search or go to and search for the project you wish to add a policy to.
- On the project left sidebar, go to Secure > Policies
- Select New policy
- In the Scan result policy section, select Select policy.
- Complete the fields:
- Name: The name of the Policy
- Description: The description of the Policy
- Policy status: Whether it is enabled or not
- Rules: The conditions that must be met for an action (require approval) to take place
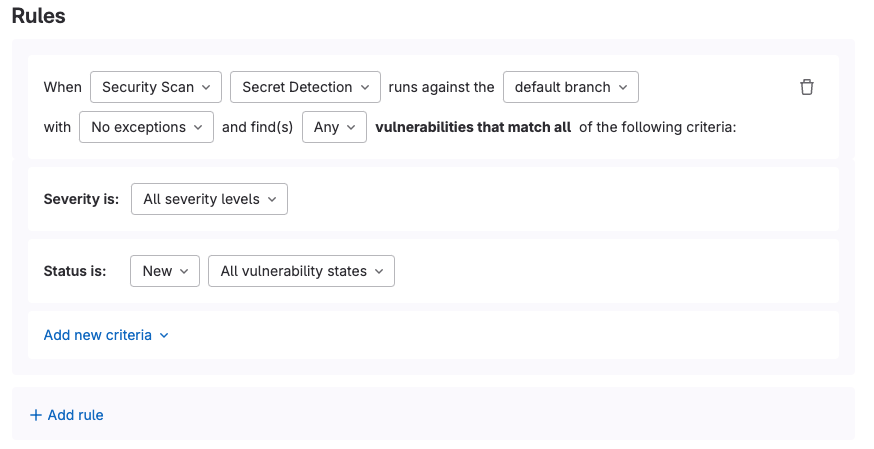
- Actions: The action to be taken whenever the conditions in the rules (defined vulnerabilities/licenses detected) are met

- Override project approval settings: If selected, the following choices will overwrite project settings but only affect the branches selected in the policy

- Press the "Configure with a merge request" button.
Once the Scan Result Policy has been merged, whenever you create a merge request and the criteria defined in the rules are met, then the defined action will be triggered. In this case, at least one approval will be required from a maintainer before the code can be merged.
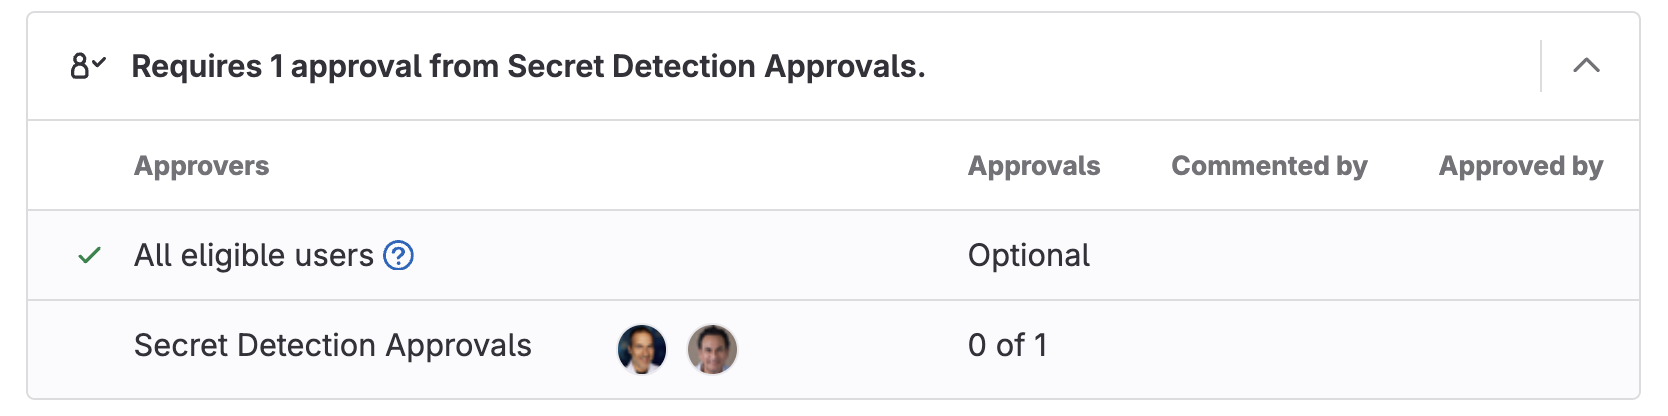
The results of a custom scanner can be fully integrated with Scan Result Policies. If the custom scanner detects a vulnerability, then approval will be required before the code can be merged. The scanner you select in a Scan Result Policy must be leveraging the appropriate JSON schema.
Tutorial: Integrating custom security scanners
Now let’s get to the fun part – integrating a custom security scanner. In this tutorial, you will learn how to create a custom security scanner, as well as how to integrate it with GitLab. We will be leveraging the following projects:
- Fern Pattern Scanner: Scans your files looking for specific patterns such as passwords, private keys, and social security numbers.
- Secret list: Contains a list of user passwords, clients, and keys. This project is used to showcase how a custom security scanner can be integrated into GitLab.
You can watch the following video to see how the application was created and how it is used in detail:
Creating a custom security scanner
Now let’s create a custom scanner that can be integrated into GitLab. Before a custom scanner can be fully integrated with GitLab, the scanner must:
- scan a directory for defined patterns
- emit a JSON following the appropriate schema
- be containerized and accessible
- provide a template to allow it to be run on another project
When the Fern Pattern scanner is run on a project using the provided template, it performs the following steps:
- Loads a set of rules which define patterns (regex) to detect.
- Allow rules to be configurable to meet the changing needs of your organization.
- Scans files for defined patterns.
- Emits a JSON report following the Secret Detection schema.
- Go templates are used in this project to create a JSON.
- Depending on what your scanner will look for, make sure you use the appropriate schema.
Once the JSON report is loaded as an artifact into GitLab, it will populate the merge request widget, Vulnerability Report, vulnerability pages, Scan Result Policies, and Security dashboards as defined above.
Integrating a custom security scanner with GitLab
Once you have created your custom scanner that meets all the needs for integration, you can run it on GitLab.
Running a custom scanner is as easy as adding a template. We can see how the Fern Pattern scanner template is loaded by examining the .gitlab-ci.yml in the Secret List project.
- Create a .gitlab-ci.yml file in the project you want the scanner to run on.
- Include the Custom Scanner template.
- You should also be able to configure the template with environment variables.
- Commit the file to the main branch.
Once the file has been committed, you can see that the custom scanner will run in your pipeline. Once the pipeline is complete, the scanner will populate all the areas defined above in the GitLab security scanner integration section.
Read more
Check out these resources to learn more about GitLab and the other ways you can extend your DevSecOps platform: