Published on: July 6, 2023
7 min read
How to automate the creation of GitLab Runners
Follow this step-by-step guide for automating runner setup using new runner creation workflows.


Automating the creation of GitLab Runners is an essential tactic in optimizing the operations and management of a runner fleet. Since announcing the deprecation and planned removal of the legacy runner registration token last year, there have been various questions by customers and the user community regarding the impact of the new workflow on any automation they rely on for creating and registering runners. This is a step-by-step guide for automating runner setup using the new runner creation workflows as depicted in the sequence diagram.
New terminology and concepts
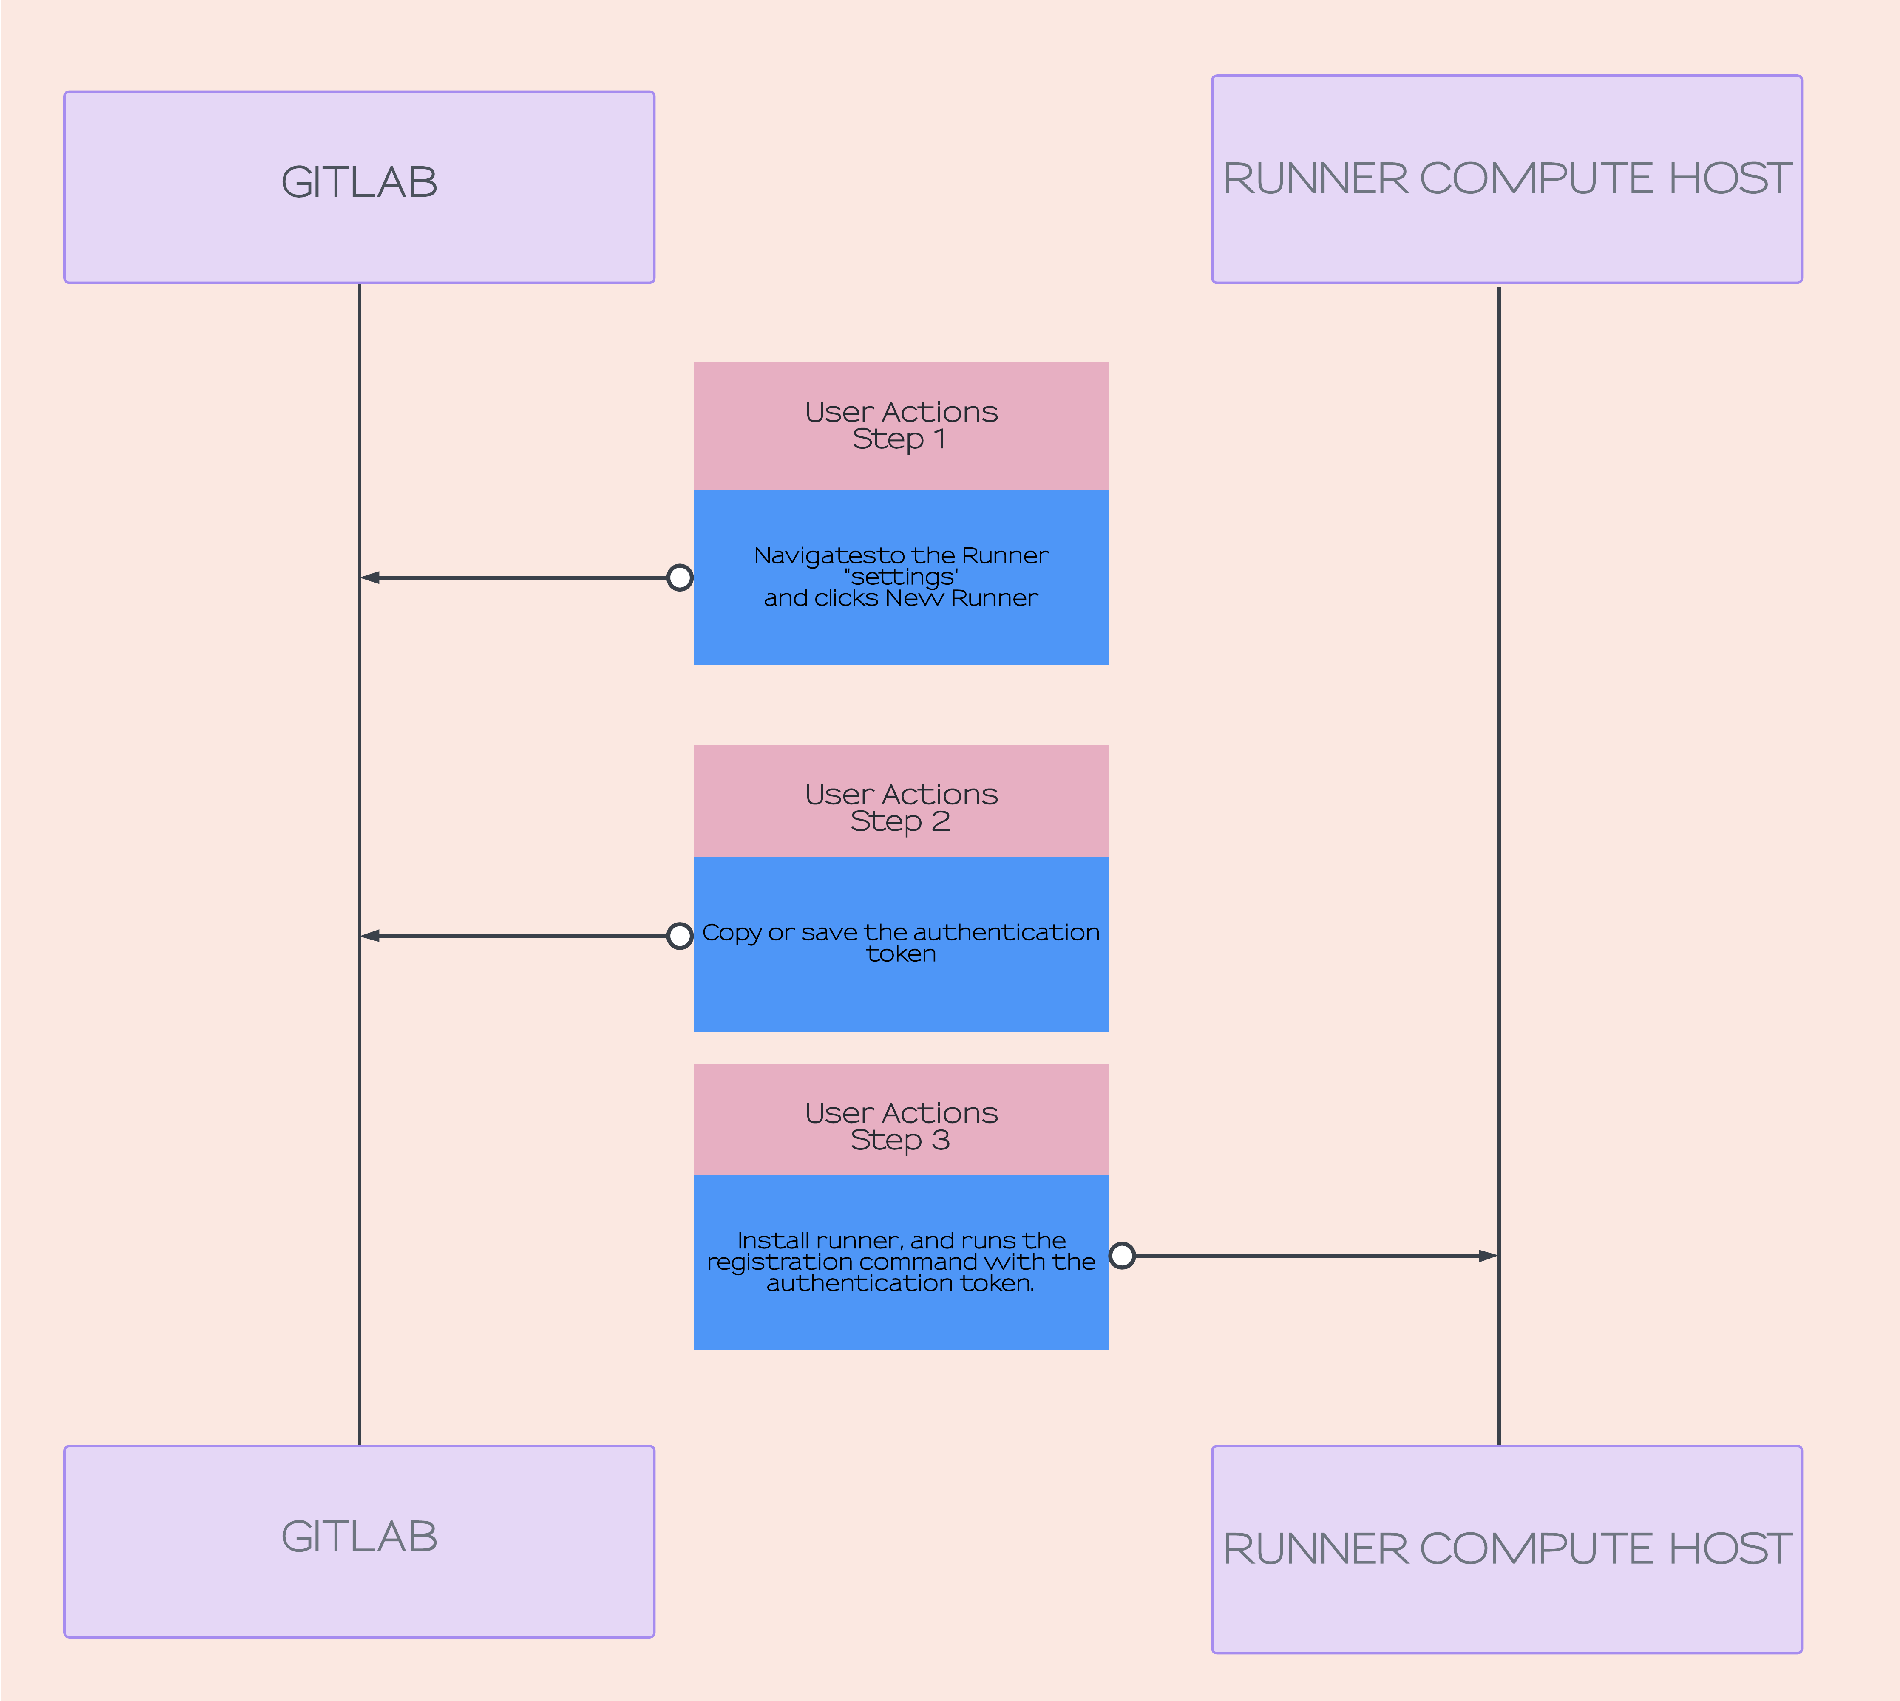
Before we dive into the automation steps, let’s first review a few new concepts with the runner creation process and how that differs from the registration token-based method. With the registration token method, a registration token is available for the instance, for each group, and for each project. Therefore, in a large GitLab installation, with many groups, sub-groups, and projects, you can have tens of hundreds of registration tokens that any authorized user can use to connect a runner. There are two steps to authorizing a runner (the application that you install on a target computing platform) to a GitLab instance:
- Retrieve a registration token.
- Run the register command in the runner application using the previously retrieved registration token.
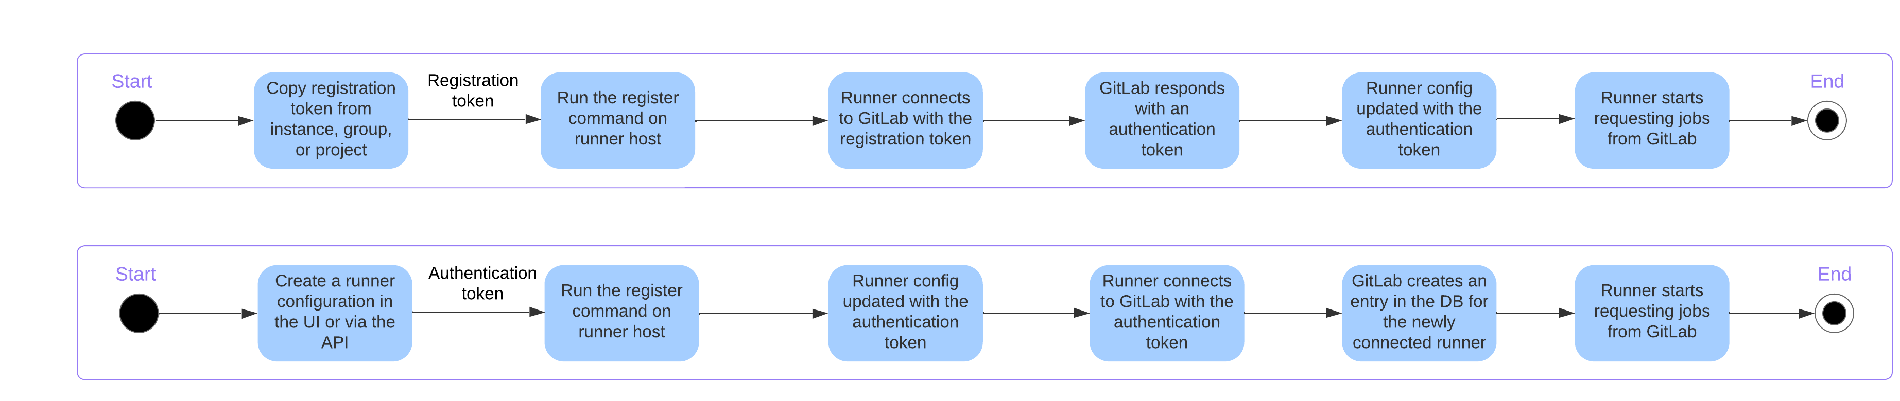
The workflow images below depict the runner setup steps using the registration token compared with the new runner creation process.
Reusable runner configurations
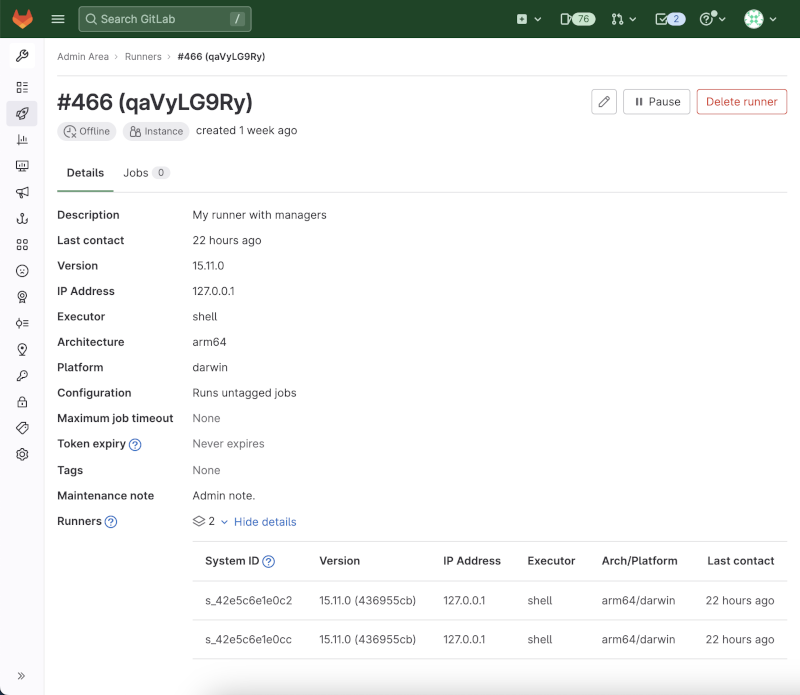
Now, in the registration token method, if you authenticated multiple runners using the same registration token (a valid use case), each runner entity would be visible in the UI in a separate row in the list view. The new creation method introduces the concept of a reusable runner configuration. For example, if you have to deploy multiple runners at the instance level, each with the same configuration (executor type, tags, etc.), you simply create a runner and configuration once, then register each individual runner with the same authentication token that you retrieved from the first runner creation. Each of these runners is now displayed in the UI in a nested hierarchy.
We heard from many of you that your Runners view was cluttered because each runner created received its own row in the table, even if they were the exact same configuration as 100 others. With this change, our intent is to ensure that you have the flexibility you need to configure a runner fleet at scale while ensuring that you can still easily understand and manage the fleet in the GitLab Runners view. We understand that this is a paradigm shift that may take some getting used to.
Automation steps for creating a runner
Here are the automation steps to create a runner.
Step 1: Create an access token
You will first need to create an access token. A personal access token for an administrator account will allow you to create runners at the instance, group, and project levels.
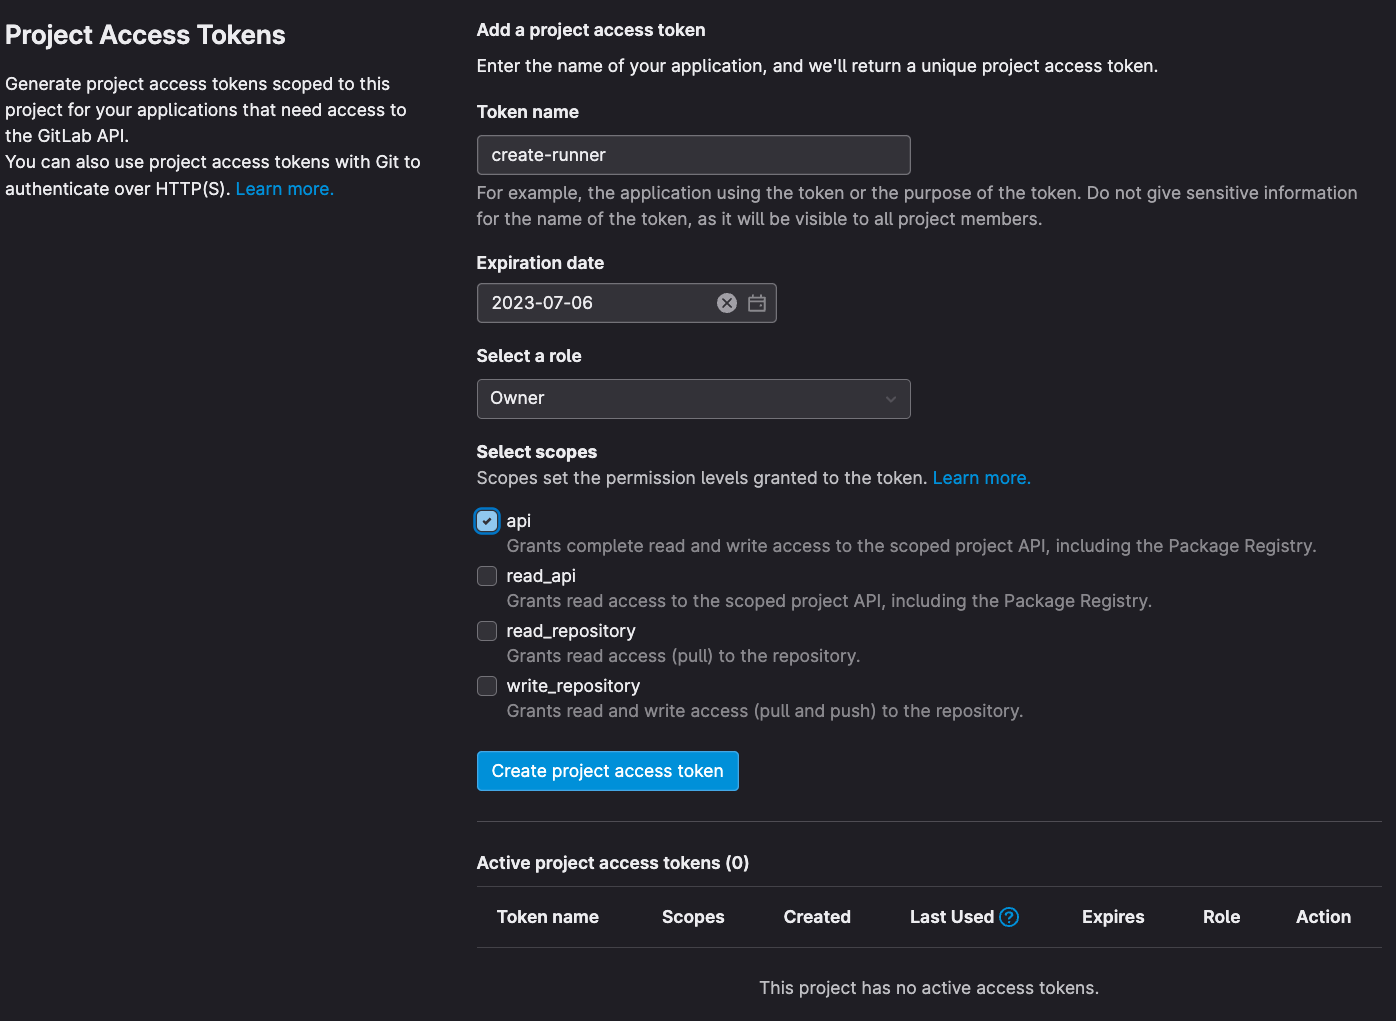
If you only need to create a group or project runner, then it is best to use a group access token or project access token, respectively. For a group or project, navigate to Settings / Access Tokens and create a token. You must specify a name, the token expiration date, role, and scope. For the role, select Owner; for the scopes, select create_runner.
Note: The access token is only visible once in the UI. You will need to store this token in a secure location - for example, a secrets management solution such as Hashicorp Vault or the Keeper Secrets Manager Terraform plugin.
Step 2: Use the access token to create a runner in the GitLab instance
Now that you have an access token scoped to the instance, group, or project, the next step is to use that token to create a runner automatically. In this example, we will simply invoke a POST REST endpoint in a terminal using CURL.
curl -sX POST https://gitlab.example.com/api/v4/user/runners --data runner_type=group_type --data "group_id=<target_group_or_project_id>" --data "description=software-eng-docker-builds-runner" --data "tag_list=<your comma-separated tags>" --header "PRIVATE-TOKEN: <your_access_token>"
Once this step is complete, the newly created runner configuration is visible in the GitLab UI. As the actual runner has not yet been configured, the status displayed is Never contacted.
The API will return a message with the following fields: id, token, and token_expires_at. You must save the value for the token as it will only be displayed once.
As mentioned above, a critical point to note in the new runner creation is that you can reuse the runner token value to register multiple runners. If you choose to do that, runners created with the same token will be grouped in the Runners list. Whichever runner contacted GitLab most recently will be the one whose unique data (IP address, version, last contact time and status) displays in the list. You can still view all the runners in that group and compare all of their unique data by going to the details page for that runner. Each runner in the group is uniquely identified by their system_id.
At this point, you might ask yourself, what’s the difference between this new workflow and the workflow that relies on the registration token? The benefits are:
- You can now quickly identify the user that created a runner configuration. Not only does this add a layer of security compared to the old method, but it also simplifies troubleshooting runner performance issues, especially when your fleet expands.
- Only the creator of the runner or administrator(s) can edit crucial configuration details like tags, the ability to run untagged jobs, the setting to lock to only run jobs in the current projects it is shared with, and more.
Automation of runner install and registration
With the runner configuration creation steps completed, you now have a runner or runners configured in your GitLab instance and valid runner tokens that you can use to register a runner. You can manually install the runner application to a target compute host or automate the runner application installation. If you plan to host the runner on a public cloud virtual machine instance – for example, Google Cloud Compute Engine – then a good example pattern provided by one of our customers for automating the runner install and registration process is as follows:
- Use Terraform infrastructure as code to install the runner application to a virtual machine hosted on GCP.
- Use the GCP Terraform provider and specifically the
metadatakey to automatically add the runner authentication token to the runner configuration file on the newly created GCP virtual machine. - Register the newly installed runner with the target GitLab instance using a cloud-init script populated from the GCP terraform provider.
Example cloud-init script
#!/bin/bash
apt update

curl -L "https://packages.gitlab.com/install/repositories/runner/gitlab-runner/script.deb.sh" | bash
GL_NAME=$(curl 169.254.169.254/computeMetadata/v1/instance/name -H "Metadata-Flavor:Google")
GL_EXECUTOR=$(curl 169.254.169.254/computeMetadata/v1/instance/attributes/gl_executor -H "Metadata-Flavor:Google")
apt update
apt install -y gitlab-runner
gitlab-runner register --non-interactive --name="$GL_NAME" --url="https://gitlab.com" --token="$RUNNER_TOKEN" --request-concurrency="12" --executor="$GL_EXECUTOR" --docker-image="alpine:latest"
systemctl restart gitlab-runner
What's next?
So there you have it, an overview of how to automate runner creation, installation, and registration. To summarize in three simple steps:
- Use the API to create a runner token and configuration.
- Store the retrieved authentication token in a secrets management solution.
- Use infrastructure as code to install the runner application on a target compute host.
Our long-term vision is to directly incorporate this automation lifecycle into the product to simplify your day-to-day runner fleet management operations.